Research the requirements to become a public safety or emergency response dispatcher. Learn about the job description and duties, and read the step-by-step process to start a career in dispatching.
↧
How to Become a Dispatcher: Education and Career Roadmap
↧
How to Become a Real Estate Developer: Education and Career Roadmap
Find out how to become a real estate developer. Research the education and training requirements, and learn about the experience you need to advance your career in real estate development.
↧
↧
Become a Bookkeeper: Education and Career Roadmap
Research the requirements to become a bookkeeper. Learn about the job description and duties and read the step-by-step process to start a career in bookkeeping.
↧
How to Be a Project Coordinator: Education and Career Roadmap
Learn how to become a project coordinator. Research the education, training, and experience required for starting a career as a project coordinator in one of several fields.
↧
Become a Professional Typist: Education and Career Roadmap
Learn how to become a professional typist. Research the career requirements, training information, and experience required for starting a career in professional typing.
↧
↧
Steps to Becoming a CPA
Learn how to become a Certified Public Accountant. Research the job description and the education and licensing requirements, and find out how to start a career in accounting.
↧
How to Be a Celebrity Manager: Education and Career Roadmap
Research the requirements to become a celebrity manager. Learn about the job description and read the step-by-step process to start a career in celebrity management.
↧
How to Become a Realtor: Education and Career Roadmap
Learn how to become a realtor. Research the education requirements, licensure information, and experience required for starting a career in real estate.
↧
Become a Credit Card Broker: Education and Career Roadmap
Learn how to become a credit card broker. Research the education requirements, training information, and experience required for starting a career in credit card brokering.
↧
↧
How to Become an Athletic Manager: Education and Career Roadmap
Learn how to become an athletic manager. Research the job description and the education requirements and find out how to start a career in athletic managing.
↧
Amelia Update: New Dashboard Look and Cool New Features
As you might already know, Amelia 1.5 is now live! But what does that mean for you, we will explain here.
We strive to make Amelia more and more helpful for all the business owners and end-users with every single feature that we add and a bug that we fix. We want to answer the needs that Amelia’s users might have. We keep monitoring Amelia’s features wishlist carefully, and recently another set of the most wanted features was released.
#1 Feature: Sorting of Services on the Service page
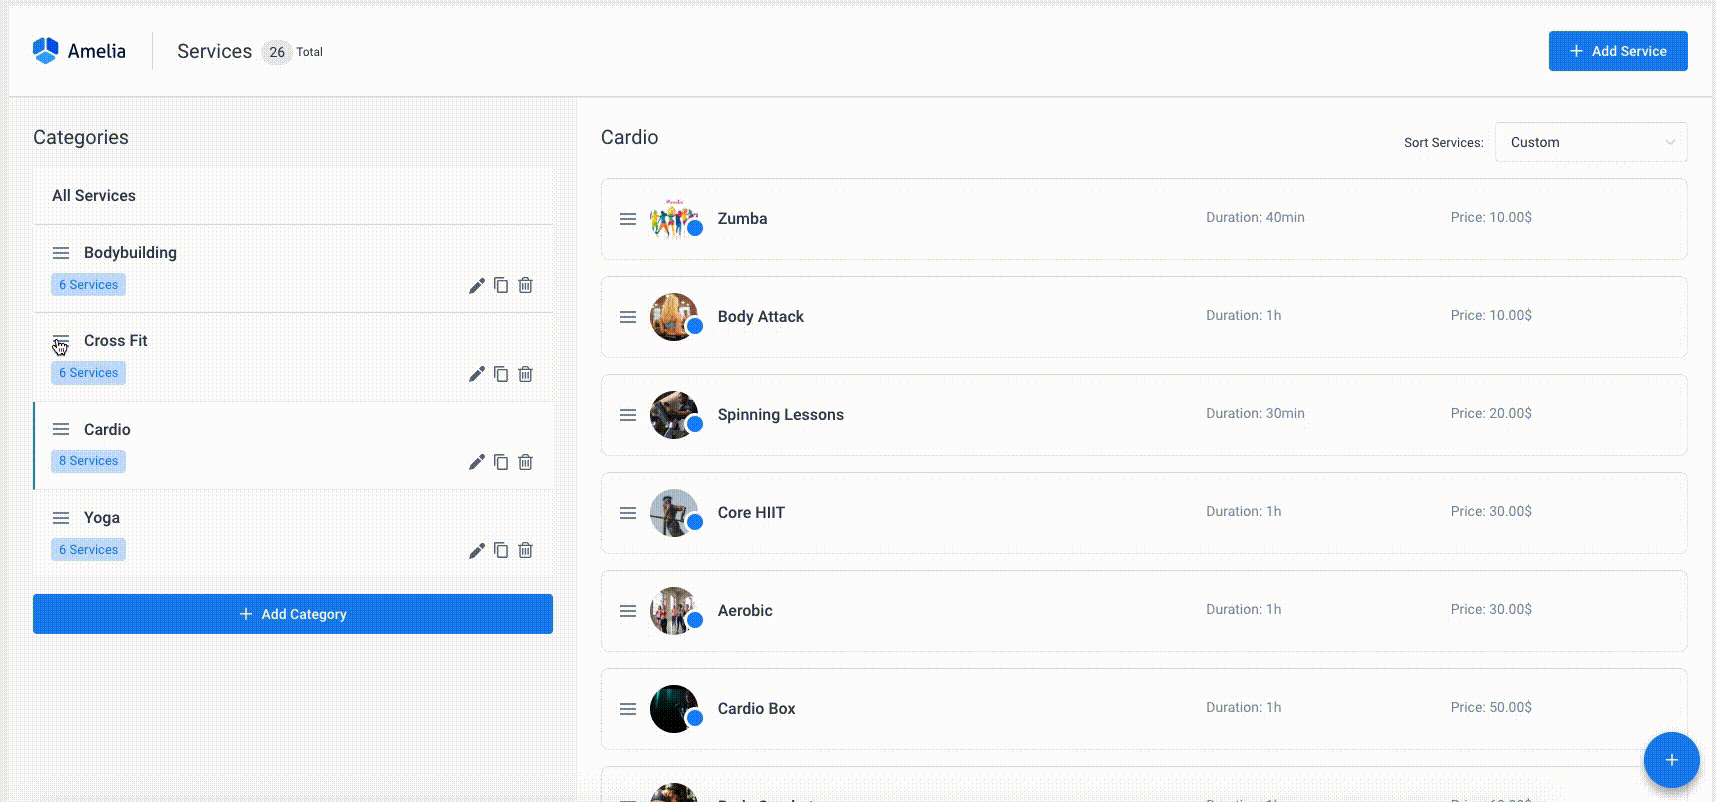
Now it is possible to sort services on the Service page and reorder them the way you need them to appear on the front end, the way you want your users to see them. It doesn’t strictly have to be in alphabetical order anymore; now you can put the service you want to promote first for example! What is even more impressive, you can do it by just dragging and dropping it in the right position – easy like Sunday morning!
In the Sort Service dropdown you have four main options: “Name Ascending”, “Name Descending”, “Price Ascending”, and “Price Descending”; but you also have “Custom” as an option, it will be automatically chosen if you manually move any service on the list with drag and drop function.
#2 Feature: Email address doesn’t have to be mandatory!

A lot of businesses that use Amelia to take care of the booking process didn’t want to collect the email addresses of their customers, and it is something that we just made possible. Now your booking form can become even more straightforward and quick to fill: disable “email is mandatory” option on the General Settings page, and your customers will be able to finish the booking process without entering any email address. Voilà!
#3 Feature: Send all notifications to the additional email address
Many business owners would like to be in the loop, and know which appointments are being booked at their website “on the go”. This new option allows you to define one additional email address that will receive all notifications that you have enabled on the Notification page. If you, as an owner, prefer to receive all the email notifications about the appointments, enter your email address in the Notifications settings page, and you will receive copies of all the email notifications sent to your employees and customers.

#4 Feature: Restrict customers from booking group appointments if their group is smaller than the required minimum

Do you have some services that require a certain minimum amount of attendees to be performed? It is not comfortable if you need to call someone and let them know that the appointment they booked won’t happen. That kind of thing happened to all of us at least once.
For example, you are organizing a group therapy and unless there is a minimum of 4 people attending it won’t make sense. Now, you can configure Amelia to automatically prevent customers from scheduling appointments for certain services if the number of people in their group doesn’t meet the minimum capacity requirement – this is just one more thing Amelia will handle for you and help you avoid an unpleasant situation, isn’t that excellent? If, on the other hand, you do allow booking appointments even if the minimum capacity is not reached – it is possible as well.
#5 Feature: Choose whether your customer will see other customers in the Google Calendar Events
Customers will not see other attendees by default in Google calendar events, but if you want them to be seen from other’s customers’ calendars, you can quickly turn this option on, so customers know who the guys they will be attending the appointment with are.
#6 Feature: RTL (right-to-left) writing
To support all of you speaking and writing Arabic, Hebrew, Persian, Urdu, and other languages that use RTL (right-to-left) writing, RTL feature is added!
Additional small features that will make your bookings nice and easy:
- Admin, manager, and employee (if you allowed them in the Roles Settings) can now approve appointment below minimum capacity,
- Added %extra_name% and %extra_quantity% placeholders in the notifications,
- Added more options in Minimum time required before booking and canceling options
- Added 1 and 2 minutes time slots in Time Slot Step option, more options – more fun!
- Added option in Appointment Settings to choose whether you will allow booking above maximum capacity for appointments with Pending status,
- Allowed editing of the appointments in the past,
Additionally, you will have an even better and modern Dashboard, all your important metrics will be just in front of your eyes. Amelia Dashboard is redesigned to look nice, but more importantly to be more useful to you and your employees. With new charts and tables, you can better follow your appointments, employees, and services.
In the end, we would like to mention some bug fixes that won’t annoy you anymore:
- Fixed issue with sending notifications when customer schedules through the Search booking form.
- Fixed issue with time zone option and appointment time placeholders in the notifications.
- Fixed issue with the total price when the appointment with extras is added from the back-end.
- Fixed issue with status translation on the Customer’s back-end.
Conclusion
To track how Amelia is becoming smarter and smarter by time, or to find the feature you need, don’t forget to check: Changelog. With new functionalities added, Amelia is becoming one of the best assistants you can ever higher, and that your customers love.
The post Amelia Update: New Dashboard Look and Cool New Features appeared first on Amelia Booking WordPress Plugin.
↧
Affordance in Web Design: What Do You Need to Know About It?
Affordances refer to the properties that an object has. These properties tell users how many actions they can do using the respective object. To put it simply, imagine a button. Buttons are created to be turned or pushed. The properties of this button transform it into an object that can be either turned or pushed. These properties represent the button’s affordance.
Even though this term can seem a bit technical, it is useful when talking about web design. In website design, terms are often used interchangeably, which leads to confusion.
The correct use of terms can represent the key to obtaining a better user experience. Web designers must use consistent terms to describe their work so that they can communicate with each other properly.
This is the purpose of affordances. They help web designers think of products with affordances to figure out what the outcome should look like.
Nonetheless, understanding the affordances psychology is more and more difficult because the way people use and control objects has changed over the years. Solid knowledge of what an affordance is will help any web designer, as it is an essential and highly useful concept in web design.
What are digital affordances?
The purpose of web design is to improve the user experience. Affordances and metaphors can be used specifically for achieving this goal. At first, digital affordances may seem irrelevant for the process. Some people might even consider them counterintuitive. Digital interfaces can deeply influence the user experience, as the model of interaction changes entirely.
The digital world is full of different types of affordance. For instance, when a person clicks a submit button, they do it because of how the button looks. It has characteristic elements that tell users that it is an interactive element. Simple text, with no effects on it, wouldn’t encourage people to click it in any way.
This is where digital affordances intervene. Making the hyperlink look like an actual button that resembles the item in the real world would help visitors find and use the element.
The whole purpose is to make the digital element look like one encountered in the real world so that visitors can easily associate the characteristics. Learn below more about this topic in this article created by our team at Amelia.
User Interface elements and interactivity

Web designers are the ones responsible for shaping the user interfaces that people get to use. They use elements that are supposed to make visitors interact with them.
This means that all the elements they include on a user interface must-have features that make them look interactive. The way users perceive and use a website is solely the result of how a web designer put together the UI elements. The whole design is focused on encouraging interaction.
The theory of affordances in web design
Once you understand what an affordance is and how it can be used, you will get better at interface design. Using affordances in web design will lead to better usability and more interaction from the users, depending on the purpose of the website. An affordance can influence the conversion or registration rates, for example.
The user behavior on a site can change entirely once affordance theories are applied in web design. Because of the visible impact it has, an affordance should be the main concern of a web designer before starting a process, even though it can seem tricky at first.
Examples of affordances in web design
After web designers learn how to define affordance, it’s time to study aspects related to each type of affordance. They all have the same purpose: setting clear expectations and respecting them until the project is done.
Labels

Labels represent the most common type of affordance. Labels are specific for websites that target a less tech-savvy audience. For websites that have complex interfaces that are difficult to navigate, using labels can rapidly make it easier to use. A label indicates the function of an element, thus letting the user know what it does.
For instance, when a user completes a form, they expect to have details about what they should write in each field. Because all forms are customized for each website, there is no pattern that they could follow in this sense. The second option would be a validation process where visitors would rely on their mistakes to figure out what they should type into the fields. Clearly, that wouldn’t be good interface design.
To organize the functions of a website, the label affordance is used. It is the clearest, most precise method of giving people details about how the form fields work and what they should do in order to interact with the site.
Patterns

People who spend time on different websites will notice patterns between them. These patterns refer to certain actions that are repetitive and they are the same, or at least similar, on every site that people access. For instance, when visualizing pictures in carousel mode, users will know how to use the left and right arrows to browse through the images.
The pattern affordance can be elegantly used on any type of interface to signal actions to the visitors. People are exposed to a myriad of pattern affordances every single day, by browsing various types of websites. This way, they become quicker at recognizing and using them when they stumble upon similar ones.
Metaphorical affordances

The easiest way to add an affordance in web design is to have a real-world reference. This object that is existent in real life represents metaphors for the affordance. Take icons for examples. Most icons are inspired by real-life objects, thus communicating affordance.
Email icons use envelopes as a metaphor. The homepage of a website is often signaled by using a house icon, which transmits the idea of “going home”. Printer icons refer to using the functionality of a printer and so on.
Interestingly, the icon for the save function is a Floppy Disk which is obsolete technology, but designers still use it because it acts as both a metaphorical affordance and a pattern affordance, in that people are accustomed to the association.
When web designers think of ways to convey a message through visual elements, they should use metaphorical affordances. The physical world offers designers the exact inspiration they need to create visual aids that are intuitive to use. It’s important to keep in mind that not all web designers use metaphorical affordances, but they represent the best starting point if you’re out of ideas.
Explicit affordances

These are similar to metaphorical affordances at some level. An explicit affordance relies not only on the physical aspect of a real-life object but also on language. When a person visits a website and a button has “Click Me” written on it, there are two types of affordances combined: the physical appearance of a regular button and the persuasive short phrase.
Explicit affordances are the ones that help web designers guide users through the interface. Whenever a user has to fill a form, they require more information about what information they should insert in that field.
Spelling out direction through an explicit affordance is a foolproof way to design the user interface, but it can also be troubling if it is used excessively. Make sure to give users enough room to make decisions on their own and use their intuition.
Animated affordances

Animated affordances refer to those actions that users are required to do in order to interact with elements on the site. They are also inspired by physical objects and activities. Dragging and dropping is a common interface animation that most users enjoy.
Similar actions such as pulling or swiping are also used by web designers to make the user interface more interactive. The trick is that animated affordances combine the digital world with the physical one because it gives users the feeling that they’re interacting with real, palpable things.
Hidden affordances

A hidden affordance will only appear when certain conditions are present. For instance, making a word clickable only on hover. The affordance is not present until the user discovers it and interacts with it.
Web designers should use hidden affordances for websites that already have a cluttered interface and would like to visually simplify it. The only drawback of a hidden affordance is that the user has to find it on their own, without having any clues that point them to it.
False affordances

False affordances are random mistakes that web designers make and don’t notice. Their effect is not pleasing to the user. Users expect something to happen when they notice an element that has certain characteristics (e.g. a button).
In some cases, because of minor web design mistakes, the element doesn’t do what it is expected to do. Simply put, a button won’t do anything when clicked. These are small details that are sometimes missed during the design process.
An affordance doesn’t exist in the real world, but it has a tremendous impact on the digital world. People spend a lot of their time online, so it’s important to understand the importance of affordances and how they are used in web design to help users interact with and navigate a website.
If you enjoyed reading this article about the affordance in web design, you should read these as well:
- The Best Portfolio Website Templates to Showcase Your Work
- Web Design Trends 2019: What to Expect?
- How to Perform a Website Critique on Your Own Project
The post Affordance in Web Design: What Do You Need to Know About It? appeared first on Amelia Booking WordPress Plugin.
↧
Web Designer vs. Web Developer: What’s the Difference?
People are oftentimes confused when it comes to using the terms web designer and web developer. Even though both jobs involve working in the same type of business, they are visibly different, and they require totally opposite skill sets.
There are people who deal with web design and development at the same time, but that doesn’t mean that the two jobs are the same. They are not identical jobs. Instead, they are complementary. When people use the terms web designer versus web developer interchangeably, they are stirring a hornet’s nest, because it’s just plain wrong.
It is important to understand that an entire team can be required to design and launch a complex, interactive website. The development team can range from one or two members to fifteen or more.
The professionals involved in the process include web designers, web developers, copywriters, SEO specialists, and others. Thus, it’s easy to see how confusion emerges when analyzing what a web designer does differently from a web developer and vice-versa. This article created by our team at Amelia is here to make things clearer.
How can you define a web designer?

Web designing has to do with anything that requires an aesthetic eye and artistic talent. Web designers are the ones who deal with the looks of a website, while also making sure that the site is easy to interact with.
The work of a web designer is critical in making sure that visitors spend more time on a website. They analyze the latest trends in web design, respect design principles, and norms, follow what users expect when visiting a website, and more.
Web designers create layouts and visuals that are eye candy for the visitors, while also keeping in mind how they feel while they browse a site.
Web designers also focus on including branding elements on a website, without making them look too abrupt or incongruent compared to the rest of the design. Since web design covers a lot of responsibilities, web designers can specialize in certain aspects of the site. You can encounter:
UX designers

User Experience designers make sure that your website keeps visitors engaged. They carefully analyze data before putting things into practice. Moreover, UX designers run complex tests and restructure the websites when needed to keep the user experience optimal.
UI designers

User Interface designers are the ones who handle how well users can interact with the elements that are present on the website. The User Interface is everything that a visitor sees when they access a website, and it needs to be well-crafted to fit the user’s expected workflow.
Visual designers

The duties of a UX designer and a UI designer can be merged into one job, creating a separate profile – the visual designer. Visual designing refers to creating interfaces that are both visually pleasing and convenient to use. They must also respect the voice of a brand.Visual design skills involve both creativity and programming.
What is a web developer?

The definition of a web developer is quite similar to that of a web designer. Web developers have an important role in website creation, as they handle the implementation stage of the process. After figuring out the structure and goals of a website, web developers can step in to make them become a reality. Understanding the web designer vs. web developer comparison hinges on this distinction. Web developers can also specialize in different fields:
Back-end developers

Back-end refers to what users can’t see when they visit a website. It has to do with the core structure of the website – the processes that make it function. Back-end developers have strong programming skills. They usually master programming languages such as PHP, SQL, C#, and Java.
Their work doesn’t have anything to do with how aesthetic the website will turn out. Their coding efforts are related to building web servers and databases instead of what the browser displays after a request. Back-end developers are logical thinkers with heavy technical knowledge.
Front-end developers

Front-end development is also known as client-side development and it involves programming all the public-facing visuals and elements as part of a site’s design. Front-end developers often have to collaborate with web designers. Front-end developers should also have strong programming skills, but they are mostly focused on HTML, CSS, and JavaScript. They only work with elements that are visible to the users.
Full-stack developers
Full-stack developers work on all of these layers, hence the name. The layers (or stacks) include elements from both back- and front-end development. They can use all sorts of programming languages and they are also creative besides being technical.
Web designer vs. web developer: clarifying the confusion
To help complete the web designer versus web developer comparison, you should pay attention to these aspects:
What is the difference between front-end development and back-end development?

Front- and back-end development can be studied more in-depth now that you know what different web developer types do. Front-end refers to all the elements that the visitor of a website sees when they access it. Front-end professionals work with graphic elements and appearance to make the interface pleasurable to use.
Contrariwise, back-end development focuses on how the website works. In particular, it deals with the inner processes that happen when an element is clicked, or a request is made. Back-end developers use advanced programming skills to do things like link users to databases, but they have nothing to do with the user interface whatsoever.
What about visual programming and functional programming?
The tools and strategies that are used in web design and development are quite different. Web designers are those who handle front-end operations. Their work influences how users perceive a website.
They are familiar with programming languages that have to do with appearance and visuals – HTML, CSS, JavaScript. Thus, we can say that web designers rely on visual programming. Web designers are also proficient in programs from the Adobe visual software suite such as Photoshop or Illustrator. Using these tools, they can design graphic elements such as logos and icons.
Web developers primarily focus on functional programming. This means that they deal with the aspects that are not seen directly by the users. Web developers handle the inner workings of a website, making it run smoothly behind the scenes.
They are familiar with advanced programming languages such as Python,.Net, PHP, C# and more. Web developers use these languages to develop the UI that contains the site’s functions. Even so, they need to cooperate actively with web designers to make sure that the visuals fit well with the functions they develop.
Using the left and right side of the brain

This is an uncommon way to figure out the comparison between web designers vs. web developers, but it might help you get the difference faster. Some people are left-brained, while others are right-brained. This means that there is a part of the population that mostly uses their left or right side of their brains. People who are creative and oriented towards anything that is artistic or visual use their right side of the brain. People who think technically all the time and use logic in everything they do use their left side of the brain.
Web designers are right-brained. They tend to rely on intuition and artistic feel–they easily come up with creative ideas and use their imagination a lot. Right-brainers rarely think linearly. Instead, they come up with visual solutions very fast. Their eyes are trained for perceiving things aesthetically.
On the other hand (or, the other brain!), Web developers think more logically. Moreover, their ideas are mostly linear, and they follow strict principles when they work. They can find solutions to technical problems. Web developers are less creative than web designers, but they still need a strong imagination to figure things out.
What background education is required?

The educational achievements of a web designer are not as relevant as their portfolio is. Between a web designer and a web developer, designers have a slight advantage.
They don’t need to follow specific courses to be able to professionally design a website. Their past work is more important to employees, and this is the criterion they ask for in most of the cases. Of course, a web design school or course can perfect their skills.
Things are different when it comes to web developers. In order to have advanced skills in programming, web developers are generally expected to graduate from a school or university. Coding experience does matter too, but it can’t be achieved unless they go through a lot of the theory.
There are web developers that didn’t obtain a bachelor’s degree in programming and still perform well, though. It is a criterion that makes the difference only when the employer considers it relevant for their project.
The terminology confusion
The difference between web designers and web developers should be clear by now, but you might still be confused when someone uses the terms interchangeably. There is a terminology confusion that will continue to be made until people figure out what each of these jobs involves. A good idea would be asking for more details about the responsibilities of the person when someone brings up the name of the job. This way, you can tell whether the person is a web designer, a web developer, or both.
If you enjoyed reading this article about Web Designer vs. Web Developer, you should read these as well:
- Web Design Trends 2019: What to Expect?
- 6 Useful Web Design Contract Templates You Wish You Knew About Sooner
- The Ultimate Website Design Questionnaire Template
The post Web Designer vs. Web Developer: What’s the Difference? appeared first on Amelia Booking WordPress Plugin.
↧
↧
Great Tips for a Cool Coming Soon Page
Whether you have secret future plans for your website or you are simply redesigning it, leaving the website blank won’t be a pleasant experience for your visitors. Instead, you should spend some time crafting a catchy Coming Soon page to let your visitors know about your temporary absence.
Using a website under construction page is also a great marketing strategy, as it will keep people posted about the big change you will make or the event you want to announce. Importantly, it will keep the website branded, even when it is not active.
What do you need for a perfect coming soon page? Well, a few elements such as visual design, innovative copywriting, and unique layout should stir the interest of any person who is visiting your site. This matter is discussed in detail below by our Amelia team. So, read on to learn how you, too, can create an engaging coming soon page.
So, what is a “coming soon” page?

Whenever your website is down, users get to see a disappointingly blank page (or worse, an error page), unless you set up a coming soon page instead. Coming soon pages, also known as under construction pages, help website owners let their visitors know that the website is not down for good.
Instead, it may only be under maintenance in order to provide visitors with better services. Letting your visitors know that explicitly with a great coming soon page keeps them curious and makes it likely that they’ll return later. You can think of a coming soon page asa tool to help you create a sense of anticipation among your audience.
A few reasons why you should create one

Keep in mind that the coming soon page shouldn’t be around for long. It is supposed to keep visitors curious about what you are going to launch next, but everyone has a limit when it comes to patience. The reasons why you should use a coming soon page are:
- To gauge the interest of the user
Coming soon pages are sometimes used to test whether users are interested in an idea or not. For example, with a pre-launch coming soon page, startups and other organizations can quickly ascertain the level of actual interest in their new offering.
- To build anticipation
To stir that hype among your visitors, design a coming soon page that gives them just a bit of information about what’s about to happen to your website. They will be eager to find out what it is all about and return to your website once it’s ready.
- To capture leads
Even though it may seem counter intuitive at first, coming soon pages can help you capture more leads. How? You can list your social media profiles on your coming soon template and people will be tempted to click them to see whether you announced something there or not. If you also include an email opt-inform, you could build a large email list to use in the future for marketing purposes.
The ultimate list of tips and tricks
Make it attractive

You only have a few seconds to catch the attention of your users while you have your site under construction. This is why you should find the most attractive manner of building your coming soon page. Think about how tough the competition is nowadays.
You won’t be able to stand out from the rest unless you figure out how to make users interested in what you are trying to convey. The page’s visual design should not be an afterthought.
Play with words

Copy written content is probably the most relevant when building a coming soon page. Your site is down, and you have to explain why. You can’t do that without using carefully-chosen words.
Boring wording that’s already a common pattern on the World Wide Web won’t do the job. You have to think of something more creative that makes visitors want to know more. Hiring a copywriter is probably the best idea for this task, but don’t be afraid to experiment with a few action verbs and catchy phrases.
Use timers
![]()

Any website under construction can benefit from a timer that lets people know how much time is left until the site is up again. Of course, to add a countdown timer to your coming soon page template, you need to know exactly when the website will be ready.
Missing the countdown can be damaging because visitors may lose their trust and doubt your site’s professionalism. Spark urgency by using a timer, but make sure that you respect your promises.
Give visitors a chance to follow-up

While your website is coming soon, you want the visitors to know more about what features you are about to implement and what changes they should expect.
In order to keep users engaged as long as your site is down, give them some way to follow the developments. Email notifications are a great way to keep visitors posted.
You can let them know when the website is back again as well, which will surely make people check it out the minute after you send the email. Include signups but try not to be spammy with the notifications. You certainly don’t want to end up in the Spam folder.
Make it simple

Simplicity is the key to everything, and this situation is no different. Your coming soon page should be as simple as possible because it acts as your landing page for a while.
Design it with the sole purpose of informing your users about the changes you will make. Keep the layout minimalist – a message, a signup form, and a few social media accounts linked at the bottom. A few call-to-action buttons here and there won’t do any harm either.
Use videos

If you are about to launch a new product and you already filmed a promotional video, include it in the coming soon page. Talking about anticipation, there’s no better way to build it other than using catchy visuals. People prefer videos over any other type of content, so don’t hold back.
Include a full-screen video background in your coming soon page for a user experience that your visitors won’t forget. It might not be common, but that is what coming soon pages are all about – uniqueness.
List your social media accounts

Social media is the best way to communicate with your clients and visitors. Don’t miss the chance of linking your social media profiles in the coming soon page.
If they have a question to ask, they will turn to you via social media accounts. Make sure to answer the messages rapidly if you get any. Otherwise, people might get disappointed with the customer support services and won’t return to the website.
Use freebies

Users will come to your website like bees to their hive as long as you give freebies. It can be anything – an informative PDF, access to exclusive information about the product you are launching, a presentation video and so on. Offer freebies via email and you will build that email list in no time, while also building the much-wanted anticipation.
Make it fun
Regardless of the niche of your website, you will have to find creative ways to design your coming soon page. It may be difficult to find something intriguing to include in it but take your time. Being creative is the only condition of designing remarkable coming soon pages.
Explain what’s happening

Don’t build a coming soon page without clearly specifying what are the reasons behind the situation. People should know exactly why your website is down and when they should expect it to be back. Educating them on what they can do in the meantime and offering multiple informational resources should help with building trust.
Check the page’s readability twice
![]()

Design plays an important role in coming soon pages, too. Even though they should be kept minimal, you still need to use graphic elements to encourage readability.
Pay attention to how noticeable the text is, how emphasized the call-to-action buttons are or any other elements that can influence what visitors will do once they stumble upon the page. Web designers are the service providers that you want to contact for this job.
Make your contact information visible

People might have questions, and there’s no better way to answer them other than providing them with your contact information. List the channels where you would like to be contacted if anyone has anything to ask and make this information visible.
Use infographics
Infographics are a great way to incorporate both visuals and text information in the very same item. They are popular with any kind of audience and you can also make them interactive if you want. A coming soon page with graphic elements is much more engaging than one with plain text.
Don’t be too vague

Try not to be too vague about what is going to be changed about your website. The users are there to visit the site, and they will eventually. You shouldn’t make too much of a mystery out of the coming soon page. Keep the purpose of it clear and have your visitors know what to expect next.
If you enjoyed reading this article about Coming Soon Page, you should read these as well:
- Web Design Trends 2019: What to Expect?
- Tips for designing the best medical websites
- Optimize your conversion funnel to get more website bookings
The post Great Tips for a Cool Coming Soon Page appeared first on Amelia Booking WordPress Plugin.
↧
15 Sketch Plugins You Wish You Knew About Earlier
Without sketching, the UI design process would be unclear and complicated. Problems may appear and the final result won’t mirror the expectations of a designer. And sketching is not important in web design only – it is a part of the developing process in many other fields.Starting a project by outlining your ideas on a piece of paper is the best decision because it lets you picture the articulated design before actually starting to work on it. Moreover, a sketch can be presented to the client, who can offer you the necessary feedback to make eventual improvements.
Sketch is the UI web design tool that most professionals use for their projects. What many don’t know is that Sketch’s functionalities can be expanded by using plugins. Sketch plugins can speed up the workflow of any designer or could make their job easier from a myriad of standpoints.
This article created by our team at Amelia, includes an extensive list of Sketch plugins that you will definitely want to try to become more efficient with your designs:
Craft

Craft is not only a Sketch plugin – it is an entire suite. You can choose the web design tools that you need most and use them to improve your sketches. The tools include:
- A tool that lets you collaborate with other people on the same sketch.
- A web design aid that enables you to generate your own styles and share them with other people, or upload libraries from different users.
- Sketch Content Generator. With this tool, you can generate copy content or images from a predefined template, the Web, or JSON files.
- Duplicate. This is a tool that enhances the usability of the existing Sketch Duplicate feature.
- Freehand. If you are a fan of drawing freely on top of your boards or designs, this tool will grant you the opportunity to do so.
- Prototype. As the name suggests, this tool lets you create prototypes inside Sketch, which is quite convenient for web designers.
Git Sketch Plugin

The Git Sketch Plugin can be extremely helpful for teams of numerous web designers. You can use the tools to export images every time you change something in the design. This way, all the team members can notice what changes have been made in real time. It’s definitely one of the handiest Sketch plugins available.
Auto Layout

If you understand how grouping works, this is exactly what Auto Layout does. You can select more layers of your project and pin them together. Whenever you want to resize these elements, they won’t suffer any changes. It’s a convenient Sketch plugin for those who use resizing quite often.
Sketch Measure

Do you encounter trouble when exporting your projects? Worry not. This is one of the few Sketch plugins that will help you with proper exporting. The plugin adds a toolbar to your main program and you can use it to generate accurate specifications about your project. Once you’ve generated the exact measurements of certain elements in your project, you can export the data into HTML or CSS. Since the latest update, Sketch Measure looks friendlier and more intuitive to use.
Icon Font
![]()
This is a Sketch plugin that helps with adding icons to your designs. You can create icon fonts from scratch or use the ones that are already featured. Then, the fonts can be added to Sketch and each icon can be used individually when needed. Say goodbye to endlessly searching for an icon you need. Just use Icon Font and you’re all set.
Paddy

If you are tired of changing the size of elements manually, you should be happy to hear that there are some Sketch plugins that will make this job easier for you. Paddy is one of them and it enables users to create buttons with defined padding. You can use the buttons each time you want to include an element of a certain size in your design. Fast and efficient – just a few clicks away.
Sketch Repeat

Sketch Repeat is one of the web design tools that can’t be missing from your inventory. This plugin helps you save time when copying and pasting elements in your design. You can duplicate elements much quicker, without having to repeat the same operation over and over again.
Sketch Style Inventory

Do you want to include more than just one style in one single place? This is one of the Sketch plugins that make it possible. Because sketching requires a lot of imagination and finding inspiration, having multiple styles in front of you can be useful for the creative process. Try Sketch Style Inventory and see how things turn out after you use it for a while.
Dynamic Button

Wouldn’t it be great if you could just turn text into a button with one click only? Well, this is exactly what this Sketch plugin does. With one single click, you can create an automatic background with included padding around a text of your choice. Moreover, you can adjust the padding if it doesn’t fit the style.
Launchpad

Sketch app plugins are indeed diverse. Launchpad is a web design tool that helps users to convert .sketch designs to HTML webpages. Remember Auto Layout? It is developed by the same people who are behind Launchpad. Combining these two Sketch plugins will make your job much easier. Keep in mind that what Launchpad exports is not the finished product. You will still have to modify settings that have to do with load times and coding. Even so, it is a very convenient way to see how your design would look like with the current layout.
Sketch Focus

If you’re not good with focusing, this plugin will help you stay more productive throughout the day. Sketching can be overwhelming at times, and you definitely need such a plugin to manage your documents. You can add links and notes to your designs to avoid losing your ideas and know where you are with your work.
Sketch Data Studio

Do you need a good Sketch plugin for data generation? This is it. Sketch Data Studio can generate tables and charts automatically. Data can be imported from Excel or any other spreadsheet-based software. You can choose in what manner you would like your data organized. This is a plugin that drastically reduces the time spent on designing data on Sketch.
Sketch Palettes![]()

Web designers find color palettes in various places and it’s a shame that Sketch doesn’t let them upload the palettes directly. Sketch Palettes is one of the few Sketch plugins that lets you create and save color palettes, as well as share them with other users. You can fill the palettes with simple colors, gradients or patterns. Click Load Palette and you have your favorite one ready to use.
Confetti

One of the best Sketch plugins for web designers, Confetti can generate random patterns, icons or even symbols. In the design process, creating these could take a long time, so it’s best to have it automated. Confetti lets you control how the icon looks in the end, and you can alter settings such as opacity, overlap or size, too.
User Flows

Most web designers like to use flow diagrams to keep their work organized, but it’s tiring to switch from one program to another to visualize them. User Flows is a Sketch plugin that lets you create flow diagrams directly in Sketch. You can make connections between screens and buttons, link elements together, and more. Mapping out your UI has never been easier.
If you enjoyed reading this article about Sketch Plugins, you should read these as well:
- 5 Ways to Add an Online Booking System to Your Website
- The best salon booking app that you can use
- Business challenges that consultants need to know how to fix
The post 15 Sketch Plugins You Wish You Knew About Earlier appeared first on Amelia Booking WordPress Plugin.
↧
Static vs Dynamic Website: What Is the Difference?
Websites are separated into two different types: static and dynamic. Static websites are ones that are fixed and display the same content for every user, usually written exclusively in HTML. A dynamic website, on the other hand, is one that can display different content and provide user interaction, by making use of advanced programming and databases in addition to HTML. As you can tell, static websites are easier to create, while dynamic websites require more work.
This guide is a comparison between static and dynamic websites. Learn below more about this topic in this article created by our team at Amelia.
By reading it thoroughly, you will learn to distinguish between static versus dynamic websites and decide which type is right for you.
Before getting into details about each website type, you should understand how the Internet goes about serving up websites in the first place. Internet communication involves a server and a web browser.
To establish a connection between the two, a set of rules called Hypertext Transfer Protocol (HTTP) is used. Simply put, the web browser transmits an HTTP request to the server, and the server then replies with an HTTP response along with the requested webpage in HTML.
What is a static website?

Static websites usually come with a fixed number of pages that have a specific layout. When the page runs on a browser, the content is literally static and doesn’t change in response to user actions. A static website is usually created with HTML and CSS in simple text editors like Notepad.
If you need a website smaller than three pages, opting for a static website is the proper choice. Building it doesn’t take as much time or effort as in the case of dynamic websites. If the pages of your website must look different, the HTML code can easily be duplicated on each of these pages, containing the necessary changes.
Even though the website will display the same thing with no intricate navigation details, static websites don’t need to feature just plain text. In fact, you can use various multimedia elements and videos. An HTML website can look beautiful, but the page’s source code won’t change, no matter what actions a user takes on it.
What is a dynamic website?

Compared to static websites, which are purely informational, a dynamic website is more functional. It allows users to interact with the information that is listed on the page. Of course, that requires utilizing more than just HTML code.
Static websites use only client-side HTML and CSS code while dynamic websites rely on both client-side and server-side scripting languages such as JavaScript, PHP, or ASP. When a user accesses a dynamic website, the site can be changed through code that is run in the browser and/or on the server. The end result is the same as that in a static website: an HTML page displayed on the web browser.
To generate dynamic content, such websites use a combination of server-side and client-side scripting. Client-side scripting refers to code that is executed by the browser, usually with JavaScript.Meanwhile, server-side scripting refers to code that is executed by the server(before the content is sent to the user’s browser).
The static vs. dynamic battle
Meaning

The word static refers to something that is fixed, that doesn’t move or change in any way. This is enough to understand what a static page is all about. No elements on this page are changed when accessing it. Static websites are basic pages that require simple code and design elements to create. “Static” also refers to the website being fixed in terms of page numbers. A fixed number of pages are delivered just the way it is designed and stored.

Conversely, the word dynamic refers to elements that are continuously changing, interactive, and functional. Instead of being simply informational, dynamic websites include aspects that are characterized by interactivity and functionality. They are more complex in terms of building and design, but they are also more versatile.
Technicality

When discussing static vs. dynamic websites from a technical point of view, the differences between the two types of websites become even clearer. Because static websites only contain fixed content, building them can easily be done in plain HTML. The only way that a user can interact with a static page is by clicking hyperlinks and filling in forms (such as a contact form).
Dynamic websites are ultimately based on HTML and CSS as well, but server-side scripting is required to make it functional. HTML coding is used to create the basic design elements, while server-side languages are used to manage events and control actions that may occur on the dynamic page.
Coding

To create a static website, the user doesn’t need to use complex software programs. Some knowledge in HTML and CSS along with Notepad should be enough to build a simple static website. Static pages include elements such as text and multimedia elements. They are not as technical as a dynamic website, but they are not as effective either. Users will see the same design and content each time they visit the website unless you change the source code manually.

A dynamic website generates content and displays it based on what actions the users make on the page. The preferences of the user alter what is displayed to them, which can be an intricate process based on the sophistication of the website. A special editor, such as an IDE (Integrated Development Environment), is required to build dynamic websites, along with strong technical skills in server-side language programming.
Which one should you choose?
If you already own a website, you can tell whether it is static or dynamic by noticing whether the page is an interactive one or if it only contains content that is meant to be read or printed out. If you want to build a website, you need to make your choice based on the purpose of the site and the available resources that you have.
Most people prefer dynamic websites because they are easier to maintain in the long run, they encourage efficient data management, and you can expand them with extra functionality in the future. If you want the website to be complex and greatly functional, then a dynamic website should be your go-to option. The downside is that they take longer to build, and the initial costs are higher. However, CMS platforms such as WordPress will allow you to launch your own dynamic website without much of a hassle.
Static websites are for those who want to build purely informational websites, such as a company’s brochureware site. The pages won’t change as the user can’t make any choices. The content is read-only and non-interactive. Despite this, simple static websites can still look great and effectively meet their goal of informing users.
To sum up, the decision you make should be based on what you want from your website. Dynamic websites offer more possibilities yet are more complex, while static websites are more limited yet are super simple to create. Make your choice wisely, considering what you expect from the site.
If you enjoyed reading this article about Static Vs Dynamic Website, you should read these as well:
- The best black websites and tips on designing a black background website
- Blog Name Generator: How to Find a Name for Your WordPress Website
- Website Color Schemes that Look Amazing: 30 Color Palettes
The post Static vs Dynamic Website: What Is the Difference? appeared first on Amelia Booking WordPress Plugin.
↧
Visual Design Guide: 6 Principles to Keep in Mind
Visual design has to do with how a website looks and how well its design matches its function. Although visual perception is largely subjective, a natural and pleasing aesthetic can only be achieved if elements are strategically placed according to certain principles and rules.
Successful visual design shouldn’t interfere with the functions of the website or the content published on it. Instead, it should enhance everything that the website is by convincing users to spend more time on it and to interact with it.
In short, building interest in a website and providing the best user experience hinges on how everything is visually presented. Branding and design can’t work one without the other, making them inseparable. Thus, the basic fundamentals of visual perception and aesthetic graphic design must be understood by anyone who wants to create quality work.
Web designers need to possess not only knowledge but also experience in applying design rules to their projects. This article created by our team at Amelia is here to help you focus on the practical principles that matter the most in web design.
Understanding the basic elements used in visual design

Visual design is based on fundamental elements that can’t be ignored by any web designer. These are:
- Lines connect two different points and can be used for all sorts of purposes: to define shapes, to make divisions on the website, to create texture.
- Shapes are separated spatial areas on a website that graphic designers create to differentiate a part of the website from the rest. They usually differ in color or texture.
- Color palettes. A color palette is a combination of colors that are used for differentiating one element from another, to create more depth, and to emphasize and organize content. Color psychology refers to how different colors can influence the emotional response that a user has when exposed to them.
- Texture represents the way a certain visual design element is perceived to feel. If one texture is repeated throughout a visual design process, it forms a pattern. Texture can be used to direct attention towards a certain element.
- In visual design, the typeface used to transmit a message can add a different tone to it. The shape, size, alignment, spacing, and color of a font can influence how the message is ultimately perceived.
- This only applies if the visual design is based on 3D objects. Form can be created by using multiple shapes, textures, colors and other differentiating elements.
- White space. Negative space represents the area that is purposefully left blank around an area with positive space. This element is also called a figure/ground. The existent content (positive space) is the figure, and the white space around it is called ground. When designing positive space, web designers must keep in mind that ground space keeps the visual design uncluttered and brings balance to the entire composition.
- This refers to how light or dark an element is. Using contrast is a common practice in visual design because it helps with creating a sense of precision. A website without contrast elements is one of subtlety, and perhaps ambiguity. Value is mostly used in 2D and 3D design.
A list of the most important principles of design
Now that you know some of the basic elements of visual design, it’s time to delve into the principles of design which all design artists should know about. The visual design elements listed above can’t be used recklessly, without balancing them out. The principles of design describe how these elements can be composed, combined, and complemented to achieve the best results.
Unity

All the visual design elements on a page have to be placed in a careful, harmonic manner. The elements on a page can be high-quality ones, but if they are not arranged in a pleasing visual manner as well, they won’t have the desired impact.
This is where unity steps in.
Visual designers try to step away from chaos by creating a sense of unity in their projects. Because eyes are the governors of judgment, projects will only turn out great if they follow the unity principle. It tells visual designers how to orderly arrange the elements on a layout.
Gestalt

The Gestalt principles is a little bit more complex in visual projects. Gestalt basically refers to how a person perceives the sum of all parts, instead of focusing on individual elements only.
The brain processes information as a mass structure first, based on what the eyes see. The first aspect that is perceived in a design is the unified shape, composed of all the elements included in it. Before focusing on separated sections of the design, a user will look at the image they create as a whole.
The Gestalt principle involves carefully picking out the parts of a website, to make them look good together. To do this, visual designers need to match all the elements together based on aspects such as dimension, distance, shape, and others. If these elements are not conceptually similar, the result won’t look aesthetically pleasing.
Gridding

In order to place elements properly and accurately, visual designers make use of grids. Grids help with placing the visual elements evenly on a page. Coming up with a good grid system takes some effort and experience because it has to be flexible enough to fit all sorts of layouts. If the website layout changes, the grid system shouldn’t lose its consistency.
Scale
Scale refers to how elements are sized before placing them in a layout. Without scaling elements, the attention of the visitors will be directed into multiple sides, which can end up not being effective.
If one element has to be accentuated, it can be emphasized by using a different size for it. This is what scale does – it uses the size of the elements in visual design to direct the attention of the visitor towards a certain item. The scale is also used for creating a sense of depth.
Contrast

Another way to change the point of interest in visual design is by making use of contrast. This is, in fact, one of the basic design principles that people work with when they start putting layouts together. All visual designers use the contrast principle in one way or another. Contrast can be obtained by putting two elements which are visibly different next to each other. Opposite colors are often used to highlight an element (e.g. the black-red contrast).
Balance

Even though this might be similar to other principles mentioned above, balance is a concept that refers to distributing the elements of a design consistently. Not following the balance principle can lead to a design that makes visitors feel uneasy. A balanced design will look clean and natural. Balance goes hand in hand with symmetry, but it is not a necessary condition of it. Asymmetrical balance exists in visual design and it is often used to direct the interest of the user towards a center point.
Other tips to keep in mind
Combining more principles into one project

Typically, you won’t be able to use all these principles at once in your design, but it’s best to combine more than a couple of them when you are working on a project. Visual designers should select the principles based on what the website’s purpose is, rather than thumbsucking them from thin air.
One general rule is to keep the visual weight correct and to be consistent with what colors you use. The user’s eyes will follow a pattern that you set using visual design elements, so take your time to decide what principles to apply for any given scenario.
Keep the website simple

Trying to use all the principles of graphic design even if they don’t fit the website will make it look cluttered and unaesthetic. Instead, use the principles that fit your needs best. Visual design is not all about being perfectly technical, but about making the experience pleasurable for the visitors.
Make it inclusive

Following graphic design principles doesn’t guarantee that the website will turn out good. The designer’s experience, creativity, and style will impact the final result tremendously. Technical proficiency is important, but adding your personal touch is the core element of great visual design.
Use the right software

Any visual designer worth their salt should know basic designing principles, but not all software is appropriate for all designers. Choose the software program that is the most appealing to you, that has the features that you need, and that suits your working style.
Highlight the most important elements

Always focus on the elements that should be emphasized on a website. Build your design around these elements to give visitors a consistent pattern that they can follow once they access the website.
Take notes from Google’s homepage

The Google homepage is accessed by millions of people each day. As you may already know, the page is rather simple. This is why so many people appreciate it. The list of design principles that are respected on Google’s homepage is:
- Dominance: visitors focus on the large Google logo and the search box.
- Contrast: the colors used for each letter are bright primary colors and they are contrasting nicely against the white background.
- Shape: the form of the search box is rectangular and wide enough to fit even rather long search queries.
- Negative space: Google’s homepage makes plenty of use of white space; the search box is the only element that stands out.
- Balance: the page is symmetrical, as the logo and search box sit in the middle, while other elements are carefully placed on the sides.
If you enjoyed reading this article about the Visual Design principles to keep in mind, you should read these as well:
- Affordance in Web Design: What Do You Need to Know About It?
- 6 Useful Web Design Contract Templates You Wish You Knew About Sooner
- Using loading animation on websites and apps: Examples and snippets to use
The post Visual Design Guide: 6 Principles to Keep in Mind appeared first on Amelia Booking WordPress Plugin.
↧
↧
How to Design the Best 404 Page Ever
Error pages are almost always annoying to users, but that doesn’t mean you can’t turn them into a pleasant experience using a bit of creativity. Encountering a 404 page is not uncommon in the online environment, so don’t expect your users to freak out too badly when they come across one. With a little effort, you can come up with the best 404 pages ever and entertain your visitors while the website is down.
You may wonder whether this is actually possible and it’s not just some joke that you don’t have time for at the moment. Well, it’s not. Any business owner can personalize the 404 Page Not Found result so that visitors take a moment to read the message that you want to convey and return to the website later when it is up and running.
A memorable 404 error page will also help you retain your website’s professional look even during downtime. Moreover, you will get to enjoy the copious fun that comes with designing the best 404 page ever.
This article created by our team at Amelia contains a few tips and tricks that you can apply right away to keep your website errors on a positive note.
What’s a 404 error page?

The 404 error page occurs when a website, in whole or in part, cannot be accessed. The reasons are varied – the page may have been removed, the user’s internet connection might be faulty, the URL might have been typed poorly, and so on. The usual messages that appear on this page are:
- 404 Page Not Found
- 404 Not Found
- HTTP 404
- ERROR 404
- The page cannot be found
- The requested URL seems to be broken
In addition to alerting that there’s a problem, the best 404 error pages give the user information about additional steps that they can take in order to reach the website properly. Because they may now be lost or got misdirected, finding their way around the error, and getting back to a working part of your site, is essential for the user.
The reason behind creating customized 404 pages

So, you may wonder why you need a customized 404 error page since even the basic ones provide some level of troubleshooting advice. Frankly, it’s all about the user experience and how your website is perceived. By putting time and effort into making the 404 error page attractive, there is a good chance of having the visitor return to your page or website later, in the hope that it is back on track.
Visitors very quickly learn patterns about websites when they browse the Internet, and so they know the common 404 error pages that they see each and every day won’t be worth reading. It’s at that point that they may leave, never to be seen again. Once you’ve decided to create a customized 404 page, know that you’ll have to dedicate some of your time and technical knowledge to make it work correctly. The steps involved include editing the .htaccess file and running commands.
Another few reasons why you may want to create the best 404 error page are:
- Building a strong brand image– your brand’s image will be visibly strengthened once you keep the elements that you use on the very same line; if your users expect to see certain types of content or visuals from your site, use the same style when you’re designing the 404 error page.
- Increasing your SEO – use internal links on the page to send your visitors to somewhere else on your site, and reduce bounce rate by disappointed users.
- Keeping visitors happy instead of frustrated–a 404 error is not what visitors access a website for, but you can make the experience less frustrating by customizing the generic 404 error page.
- Giving your brand a voice– in many cases, brands are just a mishmash of specific visuals and mottos; through messages like this error page, you can differentiate your brand with a friendly voice that makes visitors come back for more.
- Increasing conversion rates – by accepting the fact that there is something wrong with your site and apologizing for it, there is a good chance to make the user return and transform into a loyal one, thus increasing your website’s retention and conversion rates.
Tips and tricks for a great 404 page

The main purpose of a 404 error page is to let people know that there is something wrong with the website at the moment in a clear way. Being vague won’t have a good outcome, so make sure to convey a message that specifically states what is the cause behind the error and when the site is expected to get back on track. Of course, you need to do this in a catchy manner that stirs the interest of any person who sees the custom 404 page. Here are some tips that should help you:
Carefully explain the issues

The first thought that may pop into users’ heads is that your website is permanently down. Reassure them by stating the nature of the problem. A 404 error can be solved in a matter of hours if you know what caused it in the first place. Explain the issue and the potential solutions that it may have (e.g. mistyped URL). Also, be sure to offer alternative links for them to follow.
Always speak friendly

To obtain the best 404 error page ever, use a friendly tone of voice. Adding some personality and humor to the 404 message will keep visitors entertained instead of compounding the frustration of not finding what they wanted.
Make use of visual elements

If you’re not good with words, but you still want to customize your 404 error page message, put visuals to work. Make use of color contrasts, geometric shapes, and shadows to create a visually-pleasing effect that highlights how professional the website looks even when it is stuck in a 404 error. Stick with positive color psychology, as it can reduce the negative feelings that a person may have because they can’t reach their goal.
Don’t be afraid to use images

Using a background image instead of the plain-white background that all websites have can be a good idea too. Putting together the best 404 error page ever is definitely not an easy process and it requires creativity and effort. See what image fits the context and use it for an extra touch of professionalism. Adding Call-To-Action buttons is a good idea as well if they fit the context and the page’s layout.
Illustration and animation are catchy

If you can afford to pay for personalized animations or illustrations, this is probably the best way to add visuals to a 404 error page. In case you haven’t noticed, many of the most interesting 404 pages include cute animations that turn anger into entertainment.
Link the user to another page on your site

When one of your site’s pages is struck down in a 404 error, you can direct the visitors to another page of your website that is still working. This way, they might still find something relevant to their initial search, and you can take advantage of their visit. Instead of losing a visitor for good, do something to redirect them to another part of your website. Who said that 404 pages can’t be useful too?
Make the search bar accessible
When one page in a multi-page website doesn’t work, give visitors the opportunity to look for something else. Create the best 404 error page ever by adding a search bar that visitors can rapidly use to look for other pages within your website.
Be funny

Don’t be afraid to use humor when you’re describing the 404 error. It is not the most dramatic situation that can happen to a website, so it’s best to keep the tone positive. Furthermore, humor enhances your emotional connection with users. A good laugh will erase the little hate generated by the existence of an inconvenient error.
Give direction

Users can’t be left with no choices after they are greeted by a 404 error page. Give them some direction by adding links to the most important pages of your website that are still up, or your social media accounts instead.
If you enjoyed reading this article about designing a 404 error page, you should read these as well:
- Font Combinations That Look Good On Websites
- Using loading animation on websites and apps: Examples and snippets to use
- Amelia Update: New Dashboard Look and Cool New Features
The post How to Design the Best 404 Page Ever appeared first on Amelia Booking WordPress Plugin.
↧
11 Great Dummy Text Generator Options to Choose From
Web designers generally have nothing to do with creating content for their projects. Even so, the look of a site can be incomplete if no words are included. Web designers need to find ways to incorporate copyright-free content into their designs to provide clients with a look that is as finished as possible.
Creating a prototype website that also contains copy and images is the only way to help the client understand what the concept behind your design is. Without these elements, the finished product can look quite odd, and the client won’t be able to mentally project his own content uploaded on the site.
Not all people can afford to pay for content immediately after creating their website, so that’s not a condition you can demand from your clients. Instead, you can use a dummy text generator. These generators will give you bits of text that are supposed to fill the blank spaces on the website that you are designing.
Using these text generators is very convenient, as you can set exactly how many paragraphs you need to fit your mock-up. These tools come in handy for any web designer out there. Keep reading more about this topic in this article created by our team at Amelia and learn about dummy text generators and where to find the best ones.
Defining dummy text
Dummy text refers to the bits of content that are used to fill a website mock-up. This text helps web designers better envision how the website will look as a finished product. It is important to understand that dummy text has no meaning whatsoever. Its sole purpose is to fill out blank spaces with “word-like” content, without making any copyright infringements.
Dummy text is also known as filler text or placeholder text, and it has been used for a long time in the various fields of online publishing.
What purpose does dummy text have?
Now you know what dummy text is, let’s learn about its usefulness. Some people say that they don’t need to use a dummy text generator to deliver a web design project to the customer. Even though this might be true, the effect that the final project will produce on the client won’t be as satisfactory as in the case of one with included filler content.
A dummy text generator gives web designers the content they need. Then, they can use the typefaces and layout they prefer, thus obtaining the best mock-up of their work. It would be best to be impossible to understand and read because people might get distracted by the text itself and its nonsense rather than analyzing how the typefaces integrate into the design instead.
Dummy text shouldn’t make any logical sense, to keep people from focusing on it instead of the visual impact it has. Using filler text is all about facilitating the visual impression of a final piece of web design.
Picking a dummy text generator
Lipsum

Lipsum is probably the most popular dummy text generator out there. When analyzing a website template or theme, you probably saw the Latin filler text that gave structure to the page. This was almost certainly generated with Lipsum or a similar tool. It is a simple dummy text generator where you can specify how many words of filler text you need. You can download Lipsum as an add-on for Firefox, which is quite convenient for web designers.
Blind Text Generator

This dummy text generator can provide you with filler text in ten languages. You can also choose a style, as the generator comes with a built-in CSS system to personalize the text according to your requirements. You can generate as much filler text as you need. It is one of the most convenient filler text generators out there.
Random Text Generator

If you are in a hurry and want to use a dummy text generator that is simple and not cluttered with all sorts of features, the Random Text Generator is perfect. You can choose between multiple languages if you work with international clients. The generator has the basic functions you would require from such a program, but it isn’t suitable for complex requirements.
Cameron Creative Filler Text

Filler text doesn’t have to be in a foreign or non-existent language to create the wanted effect. The Cameron Creative Filler Text is a generator that uses randomized English words, thus resulting in nonsense paragraphs. This is a great choice for people who want zero distractions coming from the filler content. As for styling, the generator comes with included HTML and CSS tools.
Twipsum

Twipsum is a dummy text generator that differentiates itself from others. The filler text is generated by starting with a word or phrase of your choice. Then, the text generator composes a paragraph based on what is currently discussed on Twitter. This is a fun way to create filler content that will surely be appreciated by anyone who notices the nice touch.
HTML Ipsum

For web designers that want to take a step away from coding on their own, HTML Ipsum is a perfect choice. The dummy text generator includes built-in code snippets that designers can use to style the filler text the way they want. Then, they can copy and paste the resulting code in their project.
Adhesion Text

With Adhesion Text, you need to type in some characters of your choice to begin. The characters can be of different origin: English, French, German, Spanish, Catalan, Portuguese, Dutch, Greek or even Arabic. After inserting the characters, the generator will build filler text based on the language’s characteristics.
Blokk

Instead of using actual filler text for the mock-up, you can use Blokk. Blokk is actually a font that is created using dashes. The dashes are arranged in a specific manner so that they resemble text. It is a modern filler text generator that is ideal for the initial stages of design.
Loripsum

Similar to Lipsum, but with more features for styling the filler text, Loripsum is a dummy text generator that is worthy of your attention. You can add lists, block quotes, and headers to your filler content, besides formatting it. This generator is a great choice for web designers that require highly structured content.
Malevole text generator

You can generate up to five paragraphs of filler content using Malevole. This dummy text generator produces readable content, so use it only if you can afford to have your client distracted by the text. If your purpose is to use filler content to provoke laughter, Malevole should be your go-to choice.
Bacon Ipsum

Another funny dummy text generator to try is Bacon Ipsum. As the name suggests, this generator will fill your website design mock-up with all sorts of meat names. It sounds odd at first, but the result will be hilarious. Unless you are working on a very serious project, give Bacon Ipsum a try.
Hopefully, the dummy text generators listed here will help you find the one that suits your needs best. All the generators above are popular in the world of web design and are used by all sorts of designers. Choose the one that seems appropriate for your own situation and let us know what you think about it.
If you enjoyed reading this article about Dummy Text Generator options, you should read these as well:
- The Ultimate Website Design Questionnaire Template
- Web Design Trends 2019: What to Expect?
- Cursive fonts to use in your next project
The post 11 Great Dummy Text Generator Options to Choose From appeared first on Amelia Booking WordPress Plugin.
↧
Gorgeous Pastel Color Palette Options to Get Inspired
As humans, we are sensitive beings that have emotional responses to all sorts of stimuli. The psychology of color analyzes how different hues can make people feel a certain emotion. Once researchers figured out how the brain works when it comes to colors, they started to be used for various purposes. One of these purposes is intelligently adding colors in web design.
Some colors are well known for their effects: increasing brand recognition, creating a sense of urgency, increasing user engagement, encouraging text comprehension, reducing eye strain, and more. This article investigates what would change if a pastel color palette is selected over other hues.
In order to get a person to do a certain action on a website, web designers have to put theory into practice and follow the principles that make this possible. Colors are part of their everyday life, so there’s no better person to choose the hues that will be used in a project other than a web designer. They usually study color psychology in depth, and they notice how it was applied for the biggest companies out there: McDonald’s, KFC, Twitch, FedEx, Taco Bell, FaceBook, Skype, Oreo, etc.
These brands have already built an image for themselves, but what happens when you want to start from scratch? What trends are still active in 2019? Well, one of the trends that had major success in past years and is now coming back strong is the pastel color palette.
Pastel hues are popular for their eye-pleasing, elegant effect. They are mostly used in clean designs, where keeping everything simple and uncluttered is a must. Design that features lightness and a lot of negative space should rely on a pastel color palette. The soft, muted hues are the perfect choice in such situations and keep reading more about this topic in this article created by our team at Amelia.
Defining pastel color palettes


Many people believe that a pastel color palette is much reduced in terms of color numbers compared to other palettes. In fact, pastels include more than just powdered pink, washed blues, and yellows. If you are familiar with the “newborn baby” feel that has become quite mainstream, it’s easy to experiment with other hues and tones in the pastel color palette.
In order to create a pastel color, choose hues with a low to medium saturation, a subdued shade, and reduced chromatic content. People call these soft colors. They can also be encountered as neutral, milky, washed out, or desaturated. These colors are easy on the eye and don’t pop out that much.This is a natural color palette that can be combined beautifully to achieve that lovely soft effect whenever it is needed.
Uses of pastel color palettes


Using colors in web design must be done purposefully. A web designer should know exactly what colors they will use throughout the process to convey a specific message. Each color has its own properties and can invoke specific desired emotions in the viewer. The most common purposes of using certain hues are supporting the brand’s identity, creating a specific web presence, and evoking a feeling.
Pastels can help a web designer alter the impact of a message. For instance, when over saturated colors are used in a design, the message can be more alert, and more urgent. Conversely, when low-saturated colors are used, the message is a mild, sophisticated one instead.
Backgrounds


A pastel color palette is the best choice for background elements that should stir the interest of the user without making the experience too harsh on the eyes. Pastels are washed out colors, so the elements can be easily overlooked unless they are placed in the right position. They have an added vibrancy that looks great when placed in appropriate combinations (e.g. white-orange). Pastels work great in top-page sections such as the headers, navigation menu, and CTAs.
Highlighting


Using the pastel color palette to add a subtle visual effect to the website’s design can be done by highlighting elements on the page with these hues. When an element is meant to stand out from the rest, using pastel colors to highlight it will draw attention very quickly. You can create both high- and low-contrast effects by using pastel color schemes.
Contrast


Even though the contrast created with a natural color palette might not be the strongest, you can accentuate elements by combining the proper hues. Contrast is a principle of design that can’t be skipped when building a layout, regardless of what palettes are used. You can create strong contrasts with pastels as long as you use a neutral background.
Neutral


Talking about neutrality, pastel tones are pale. This means that they can be merged in various ways without being rough to the sight. A soft color palette can be integrated into any type of design, for all niches. The obtained effect will be an elegant, neutral, washed out tone.
Monochrome


You don’t necessarily have to incorporate multiple hues from a pastel color palette. You can use one single hue and its variations to put together a website design. Choose one single color and play with its shades to accentuate the elements present on the site. Any neutral color should do the job, but you can be bolder and select the popular red chalk or sanguine hue. See what’s trendy today and put it into practice.
Warm/cool effect


The warm-cool effect involves using two different types of pastel colors. In printing, the black-orange temperature contrast is considered the most effective. A duo-tone palette that combines two opposite colors will give the design that needed balance and harmony. See what colors complement each other the best and use them to achieve that warm-cool effect.
Final thoughts
Considering how many options you have when it comes to choosing a set of colors, it can be tricky to find the winning combination. What’s obvious is that you can’t fail with a pastel color palette. These hues are highly appreciated these days, and they seem to be adopted in all sorts of industries, not web design only. Fashion designers use pastel hues for their gentle serenity, product designers use them for how pleasing they are to the eye, and so on. They have a distinctive feature that makes them elegant and soothing, unlike the overwhelming chromatic content of other hues.
If you enjoyed reading this article about Pastel Color Palettes, you should read these as well:
- Website Color Schemes that Look Amazing: 30 Color Palettes
- Simple Guide to Information Architecture for Web Designers
- The Ultimate Website Design Questionnaire Template
The post Gorgeous Pastel Color Palette Options to Get Inspired appeared first on Amelia Booking WordPress Plugin.
↧