Quantcast
Channel: Tampa Florida Business Consultant
Viewing all 1078 articles
Browse latest View live

Golden Ratio in Design: What You Need to Know About It

0
0

Designing is no easy job, considering how many aspects you have to keep in mind. UX design gets even more complicated, as you will have to come up with ideas that are all at once innovative, beautiful, and functional to provide people with the best experience on a website or app. What many people don’t know is that the best artists in the world have always used certain aesthetic principles to make sure that their work is as close as possible to perfection.

From Da Vinci to Dali, famous artists have emphasized their native genius by consistently incorporating age-old design principles in each of their creations. One of these principles is the golden ratio. If you’ve never heard about the golden ratio before, prepare for an amazing lecture created by our team at Amelia that might mark the way you work forever.

Defining the Golden Ratio

If you’ve only just stumbled upon this term now, you will be amazed when learning more about it. By the end of this article, you will know how to use the golden ratio to create nearly perfect designs. First of all, you should know that the numbers associated with the golden ratio are 1:1.618. The mathematical equation that led to these numbers is a bit complicated, but it’s enough to remember the answer to be able to use it. When the ratio is used, you are building a golden ratio design, meaning that your work respects the 1:1.618 proportion.

Designers of all types agree that following this principle typically leads to the most aesthetically-pleasing result, regardless of the subject. In order to create instant visual appeal, you simply need to apply this proportion,which is deep-rooted in mathematics and nature. The golden ratio is present everywhere around you, even though you might not be aware of it. The great Egyptians used it when they built the Pyramids of Giza, Da Vinci included it in his famous La Gioconda, and even today big brands use it in their logos (Pepsi, Twitter, Apple, etc.).

Golden ratio in design has been used since ancient times. It is also known as the Golden Section, the Divine Proportion, or Phi (not to be mistaken for Pi). The golden ratio grid appears when one line is divided into two different parts. The longer part is further divided by the smaller part which is equal to the sum of the previous parts. The longer part A, which is divided by B is equal to A+B/A. Mathematically, the result is 1.618 all the time. Putting it simply, the formula looks like this:

Phi = A/B = (A+B)/A = 1.618033987 = Φ
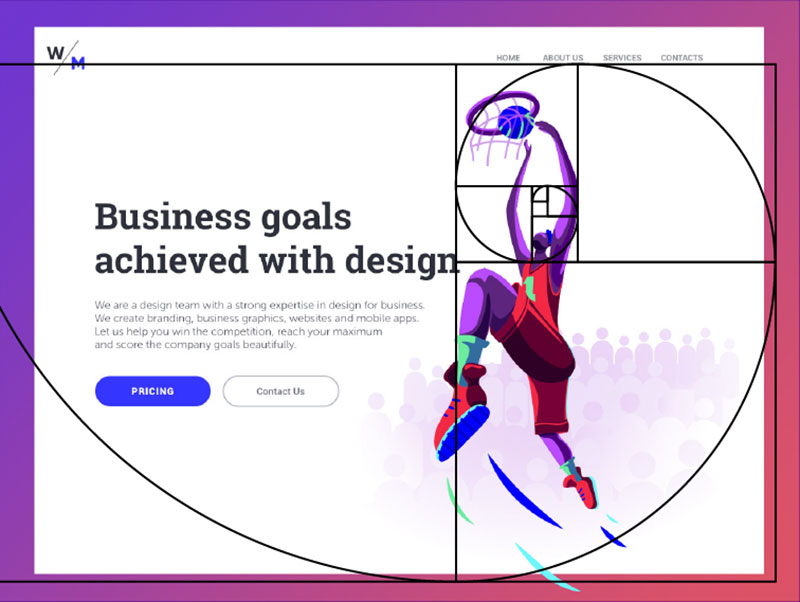
Golden Ratio’s Importance in Design

Anything that helps to create a visually-pleasing effect is welcomed in the design industry. Most works of art are based on certain proportions, and these same proportions are used in architecture, painting, sculpture, photography, and more. The use of the golden ratio in design is well-justified, as it offers structure and natural elegance. Because the human brain automatically perceives the golden ratio as aesthetic, using it in design generates a subconscious attraction. Even slight details that bring the design closer to the golden ratio grid can have a huge impact on design.

The golden ratio grid should be used as a design tool that ensures that everything is placed correctly to generate the desired emotional response. In some cases, people apply the golden ratio principle without even realizing it, which is another proof that following the grid makes sense intuitively. It is important to understand how golden ratio design works and to then apply these rules on your own projects. Ultimately, the ratio helps to create harmony and keep elements balanced. Considering that the first impression is essential in UX design, the golden ratio can also contribute to creating a feeling of natural comfort and harmony that keeps the user enchanted.

How Can You Use It in Design?

Golden ratio design can be applied in graphics, logos, product design, web design, or any other industry that is related to visual form. A website’s user interface is meant to attract users and keep them engaged, and this won’t happen unless it creates a good first impression by showing, not telling. As a web designer, you have to make sure that the implementation of the golden ratio in design doesn’t negatively influence the user experience, and only enhances it. Here are a few tips on how to apply the golden ratio in web design:

Creating the perfect layout

Every designer knows how difficult it is to fit a lot of elements into a reduced amount of space. The golden ratio grid can help save the day when it is used to determine the dimensions of a layout and where each element will go. An easy way to start a layout design is to set the dimensions to 1:1.618 from the very beginning and work with that framework going forward. The easiest approach is to use the basic 960 px width and divide it by 1.618. The obtained number should be used as a height.

Leaving enough space between elements

Many designers tend to forget the value of white space when putting together their layouts. It’s not always easy to imagine where to put negative space, but using the golden ratio will give you a sensible starting point. Determining how much space you should leave behind elements without having a reference point can be time-consuming and require a lot of effort. Instead, use the golden ratio diagram. Use the squares to determine where you should use positive space and where you should use negative space. Now you don’t have to calculate proportions from scratch any longer.

Arranging content

The same idea goes for arranging content. Using the golden ratio in design allows you to determine where each element should go. For this task, trace the golden spiral across the available space. You will find out what the center is and then arrange elements around it. Place the elements that are more important close to the focal point and the ones that are less important towards the edges of the spiral.

Creating a balanced composition

Another way of dividing the space using the golden ratio would be by separating the space into three different sections. The sections won’t be equal, but they will respect the 1:1.618 ratio. Split the space and place the elements based on their importance.

Deciding what fonts to choose

Choosing between different typefaces is also complicated in the design process. The golden ratio grid could be a great tool for selecting a typeface that meets the composition’s requirements. If the body text is 10 px, multiply it by 1.618. You will obtain 16.18 px which can be rounded to 16 px. This is the size you should use for headings.

Designing a logo

There are a few shapes that are called golden: triangle, square, circle, spiral. When building a logo, use a combination of the golden shapes to create visual balance. Of course, you can embellish the logo using a lot of other design principles, but its base structure should be built using the golden ratio.

Tips to Follow When Using the Golden Ratio

Here are some other tips you may want to apply when using the golden ratio in design:

  • Use the golden ratio to create grids for websites. If you apply the golden ratio to the basic size of a website layout, you will obtain a content area width of 846 px and a sidebar area of 520 px wide. Leave the height as it is when working with the sidebar and content area.
  • You can use the golden ratio squares to determine how much space to leave between elements. Consider the golden rectangles for elements that are more important and smaller squares for elements that are less essential.
  • Pay attention to golden ratio examples in design and see what difference they make. It will help you structure elements in your own projects.

Final thoughts

Now you know what the golden ratio is and how it can be used in design, it’s time to put it into practice. Play with golden shapes and see how they impact your design and transform the overall look of the project. Keep in mind that the golden ratio might not apply to particular projects. Ask for feedback and see what clients feel about it. Remain patient, as mastering the golden ratio in design could take years. Even so, memorize these handy tips and apply them whenever you have the chance and you will find your designs improving magically before your very eyes.

If you enjoyed reading this article about Golden Ratio in Design, you should read these as well:

The post Golden Ratio in Design: What You Need to Know About It appeared first on Amelia Booking WordPress Plugin.


Things Are Looking Up https://t.co/gXGw75Da72 https://t.co/ytWL4mspah

0
0

Things Are Looking Up https://t.co/gXGw75Da72 https://t.co/ytWL4mspah http://twitter.com/kshahwork/status/1130793635799285760)

Interview discussion: the qualities of a great leader | Dynamic Business – Small Business Advice – Forums | Dynamic Business Australia https://t.co/FfDq1mgC0o https://t.co/HbNiJo4cgK

0
0

Interview discussion: the qualities of a great leader | Dynamic Business – Small Business Advice – Forums | Dynamic Business Australia https://t.co/FfDq1mgC0o https://t.co/HbNiJo4cgK http://twitter.com/kshahwork/status/1130794294162411520)

Secrets of Succeeding as a Woman in Silicon Valley – and in Business in General – Revealed https://t.co/vpHJlvN2Hj https://t.co/Ch0W2KbP4V

0
0

Secrets of Succeeding as a Woman in Silicon Valley – and in Business in General – Revealed https://t.co/vpHJlvN2Hj https://t.co/Ch0W2KbP4V http://twitter.com/kshahwork/status/1130795795333156864)

50% of Small Businesses Do Not Have a Marketing Plan https://t.co/2HtPVjXOMw https://t.co/RumQkvUfIm

0
0

50% of Small Businesses Do Not Have a Marketing Plan https://t.co/2HtPVjXOMw https://t.co/RumQkvUfIm http://twitter.com/kshahwork/status/1130795220550017024)

How to get funding for a small business https://t.co/PXXhH9K9FN https://t.co/LAuGpTfXig

0
0

How to get funding for a small business https://t.co/PXXhH9K9FN https://t.co/LAuGpTfXig http://twitter.com/kshahwork/status/1130796514861830145)

How to get a local phone number for your business

0
0

The three digits at the beginning of your business phone number indicate to customers where your company is based. This information can either help or potentially hinder your ability to establish a relationship with them.

In the past, you couldn’t control the area code your phone was attached to. Everyone was simply assigned a number based on the location of their landline or service provider.

Now, with services like GoDaddy SmartLine, you can choose the area code you think would contribute most to your business success. If you don’t think these three numbers have that kind of power, think again. Whether you’re starting your company or already running your business, you will want to take advantage of all the help you can get.

Who should get a local phone number for their business?

Many businesses have customer bases heavily concentrated in a specific city or county. But it’s easy to end up with a phone number that uses the area code of a completely different location. Here are a few common situations in which that can happen:

  • If you live in one city, and your business is located in another
  • If your business moved but didn’t update your number accordingly
  • If your customers are located in a different area than your business

If your business relies heavily on the patronage of people who live in a specific community, it’s best to use a phone number with a matching area code. Doing so communicates that you, that your business, is, to some extent, just like them. That you know the area. That you’re “local.”

What are the benefits of getting a local phone number?

People take a lot of pride in their communities and like to support local businesses. The first thing someone will notice when you call is the area you are calling from. If they see their own area code, then you will have established a valuable connection before even talking to them by showing them that you are a part of the same community.

Not only do people like to support local businesses, but they also place more trust in businesses located within their own communities. It’s easier to believe that an order placed with a company in your own town or city will arrive on time and in full, for example, than it is to trust that you’ll get the same result from a business based in a city far away.

Why do I need a separate local phone number for my business?

Even if you already have a personal phone number with an area code that matches that of your customer base, consider getting a separate, local number for your business through a service like GoDaddy SmartLine. The benefits are twofold.

It improves your professional image

First and foremost, having a separate local phone number for your business will increase the professionalism of your business:

In a survey of over 500 small business owners, 64% cited ‘answering calls professionally’ as one of the top ways of displaying professionalism to retain and find new customers.

With a separate business line connected to your existing phone, you will be able to immediately tell whether an incoming call is personal or work-related and can answer it accordingly. Greet that new client with a confident, upbeat “Hello!” instead of the relaxed, intimate “Hey” you may greet a friend with.

When you can’t answer a call, don’t worry about customers hearing your personal outgoing voicemail message. Missed work calls will be automatically routed to a separate voicemail that you create for your second local phone number.

It improves your work–life balance

Getting a separate number to use for your business will also make it easier to manage a healthy work–life balance. Even entrepreneurs need time to themselves, but when all of your communication is done with a single phone line, catching that break can be nearly impossible. Small business owners spend an average of 8 hours a week outside of work worrying about their business and over 40% say that they regularly get pulled away to deal with business matters when trying to take a break.

When you use a single phone line for both your work and your personal life, you can’t shut yourself off from your clients unless you also shut yourself off from your friends and family. By connecting a separate business line to your phone with SmartLine, you can set specific hours, when incoming work calls will automatically be routed to your business voicemail instead of ringing your phone.

You can also make a more informed choice about when to answer and when to let a call ring. If you don’t know whether a call is coming from a prospective customer or from your very chatty uncle, for example, you can end up stuck on a personal call when you are busy working (or talking to a future client while you are on vacation). But with a separate number connected to your phone, you will be able to tell the difference right away.

How to get a local phone number

Getting a local phone number for your business is easy. With GoDaddy SmartLine, you can start texting and calling with a local business phone number straight from your smartphone in a matter of minutes.

Step 1: Download the GoDaddy SmartLine app, or sign up for SmartLine on the web.

  • It’s compatible with both IOS and Android phones.

Step 2: Choose a local phone number that works best for your business.

  • Search by area code, and pick from a list of options for a number that is easy to remember.

Step 3: Start making calls and texts!

  • Record an outgoing voicemail message for calls you can’t take, and set your business hours so that when you’re not working, business callers can leave a message instantly.

The post How to get a local phone number for your business appeared first on GoDaddy Blog.

10 best practices for picture editing

0
0

One of the most common mistakes newbies make when adding images to their DIY website is skipping picture editing — and not taking time for image editing can hurt your business.

If you hastily load pictures onto your website without any edits, it lowers the overall quality of your design, distracts from your brand and message, and makes you look sloppy.

However, if you follow a few simple picture editing tips, you’ll be able to really impress your audience and look like the professional that you know you are.

All it takes is some basic picture editing tips and you’ll be on your way to a really strong website for your business.

In fact, if you’ve created your site with a tool like GoDaddy’s Website Builder, then you’re already ahead of the game. Not only can you whip up a gorgeous site in under an hour, but also they integrate with a library of stock photos you can choose from. You don’t necessarily need your own photos to start.

Keep in mind, though, that stock images might need picture editing, too.

What you’ll learn about picture editing in this article

We’re going to cover the following topics in this post:

It’s possible you can get away with less editing if they’re from the same photographer and fit in well with your brand (you don’t need to worry much about adjusting size or cropping because that’s built into the tool.) But if you’re uploading your own photos, don’t skip the picture editing step.

Related: How to use a stock photo 8 different ways

Why is picture editing an important skill for entrepreneurs to have?

If you take the time to learn picture editing, this guarantees that your images are all top quality, and gives you the opportunity to create a clear style on your website by consistently using the same filters, lighting, or adding your logo to the picture.

Consistency is key with picture editing.


It’s pretty easy to achieve even if you only have a few initial source pictures to work with. If you’re clever, you can take a single edited photo and use it multiple ways to get more mileage out of it.

When your images look professional, this makes your business look more professional and enhances your “Know-Like-Trust Factor” (or KLT).

You’d be surprised how much of this KLT factor hinges on the quality of your website design and images.

If you take the time to edit your pictures so they look top notch, visitors will trust you more. They’ll get to know your brand better if your images are edited consistently, and they’ll like you better if your site looks amazing.

In the article, “Know, like and trust: The essence of networking,” they described the benefits as, “All things being equal, people will do business with and refer business to those people they know, like and trust.”

So you can see that when you focus on KLT, your visitors are more likely to purchase from you as well as refer you to other potential customers.

If you’re sitting there wondering how to get started, thinking, “how do I edit photos?” and maybe feeling like you won’t have the talent for it, stop worrying.

I promise you can do it!

Basic image editing doesn’t take that many additional resources or formal website design experience. Follow some picture editing best practices and come away with epic results.

Back to top

Best software for image editing

One of the main picture editing tips I give to new business owners is to take some time to learn Adobe Photoshop, because it gives you the most control and allows you to use and create mockups, graphics and more.

I’ve been using it for years and it is my all-time favorite for picture editing and graphics. But not everyone is ready for that kind of program when they’re new. Thankfully there are other options out there!

Mobile apps for image editing

I’m a small business owner, too, and often I find myself doing work LOTS of places other than my desk at home. I want to edit pictures when I’m in line at the post office or at the bus stop waiting to pick up my kids. So my biggest picture editing secret? Apps on my phone!

Photoshop does have a mobile app, but I don’t like it as much as the desktop version. So I researched a few mobile apps to use instead and three came out on top (all available for both iOS and Android):

  1. Your mobile device’s built-in image editing tools (comes with your phone). Don’t disregard this resource. You’d be surprised what you can do with tools you already have on your phone right now.
  2. Adobe Lightroom CC. Most people don’t realize that you can use this app for free! You don’t need a paid Lightroom subscription to use it. (Adobe Lightroom Desktop version is included with an Adobe Photoshop subscription so if you want to get the whole shebang, it’s not that expensive.
  3. Snapseed. This free app is my personal favorite! Check out the examples below for a demo on how Snapseed works.

Photoshop alternatives for desktop image editing

The fun doesn’t stop with these options, though, so check out these affordable Photoshop alternatives for even more photo editing tools.

Related: How to use Canva to create branded images in less than an hour

Picture Editing Snapseed Options
Back to top

Using color-embedded profiles (if possible)

One reason you might want to use Photoshop is because it allows you to use something called a Color Embedded Profile. (Lightroom allows this,too.)

According to photographer Amy Eaton in the video, “Smartphone Photography Tips for DIY Product Photos — Etsy Photography Tips,” apps that allow you to use a color embedded profile are preferable because this allows your colors to remain true across different website platforms. If you’ve ever uploaded your product photo to your website and were startled because the colors mysteriously looked CRAZY then you need to know about color embedded profiles!

Back to top

10 best practices for picture editing

Let’s take a look at 10 best practices for editing images and photos, including:

  1. Use the right lighting.
  2. Limit distractions.
  3. Use a tripod.
  4. Check rotation.
  5. Crop your photo.
  6. Size your image.
  7. Fix darks and lights.
  8. Adjust the color tone/color cast.
  9. Adjust color saturation.
  10. Cleanup.

You might think that all 10 of my best practices are limited to steps you take after your image is already shot. But actually, you need to make sure a few important things happen in the “pre” stage, too.

Your editing job is so much easier when you’re working with great source photos. It’s worth a few extra steps. So let’s start with the pre-steps.

1. Use the right lighting

Picture Editing Lighting]Your photo should be well lit.

This means natural light with reflectors, if needed, or a lightbox. And it’s best if the light is filtered through something like a sheer fabric or curtain.

If you’re using a lightbox, the walls of the box act as a filter. And if you have big fancy photography box lights, they have a filter built right around the light.

It doesn’t matter if it’s fancy or plain, use what you have available and you’ll be off to a great start.

Back to top

2. Limit distractions

Keep distracting things out of the picture.

Before you take a photo you want to do a quick scan of the area around your subject. Is there any distracting trash in the background? Or maybe an extension cord, or something on the wall that’s looking odd?

Clear all that stuff away early so you don’t have to edit it out of the picture later.

Your future self will thank you. You want all focus to be on your product or whatever the main subject of your image is — not some random things in the background.

The picture below, for example, has some distractions. There’s a pile of pens off to the side. You’d want to take the time to push these out of view before taking this shot. The wall could be OK alone, but that bead board material has a lot of vertical lines that can detract from your subject. But paired with the backsplash and counter in the dark patterned granite? It’s too much! The glass practically disappears in this location.

Picture Editing Glass Messy Background

Back to top

3. Use a tripod

Picture Editing TripodThe more stable your camera is, the sharper your image will be. Don’t rely on shaky hands and arms to take your photos or they’ll be blurry every time!

If you don’t have a tripod, set your camera on a stool or a desk — anywhere solid and steady. Just don’t hold it in your hand.

After the photo is pulled into your picture editing software, then the real work begins. For this next section, I’ll show you screenshots from Snapseed on my phone. The app is very easy and quick to use and I love that you can access it while on the go.

Back to top

4. Check rotation

Make sure rotation and perspective look good. Sometimes after you look at a photo you realize that everything is tilted.

This is easily fixed with a simple image rotation, like this one on my phone.

Once you click into the rotate tool in Snapseed, it’s easy to drag and adjust the rotation on your image or click the buttons at the bottom of the crop screen to get other options.

Picture Editing Rotation
Back to top

5. Crop your photo

You might have a particular ratio of width to height (like 5:4 for instance) that you need your final image to be, so you can crop it accordingly. Or just crop it so the arrangement in your picture looks nice and nothing important is out of view.

Here’s the crop tool in Snapseed (left picture). Once you click into it, you can drag your box size to crop it accordingly (middle picture) or click on the little button to the left of the checkmark to adjust by ratio (right picture).

Picture Editing CropBack to top

6. Size your image

Make sure your image size is right for your platform.

If you’re posting to a website, you’ll want to find out the best size for your final image needs (example: 1500px x 1200px) as well as file size maximums (actual size in MB.)

Keep these picture editing tips in mind when you’re sizing.

Snapseed doesn’t let you create a particular size in pixels, so pull your image into an outside program like Canva to size to the perfect dimensions for your site.

And be sure to compress the file size of your image to improve page load time on your website.


Free online image compression tools like Compress JPEG make it a snap!

Back to top

7. Fix darks and lights

Adjust your photo so the darks and lights are balanced. This falls under different categories depending on what application you use. So it could be in a tool called Levels, or Brightness/Contrast or something similar.

You might want shadows eliminated so everything is very bright and white or you might want to play them up.

In Snapseed you can find these features inside of Tune Image. Once you click the button to the right of the X, a little popup appears with options in it to adjust brightness and contrast.

Picture Editing Darks Lights

Back to top

8. Adjust the color tone/color cast

Often your photo might be too yellow or too blue so you have to adjust the colors to make it look more natural and true to real life. The best place to adjust this in Snapseed is in the white balance tool. Just click into that and drag the slider until the image looks natural.

Picture Editing White Balance
Back to top

9. Adjust color saturation

Saturation is about how much of the color is in the image. A very saturated image looks bright and vibrant. Don’t go too far on the saturation, though — this can be easy to overdo.

Desaturated images remove color the more you desaturate. You can even reduce a photo to black and white if you turn your saturation dial to zero.

Inside the Tune Image menu of Snapseed you’ll find this popup that you saw earlier when we adjusted brightness and contrast. The third option is Saturation. Just drag your finger left or right to adjust, just like you did on the other tool options.

Picture Editing Saturation
Back to top

10. Cleanup

Clean up any blemishes in your shot, like spots or dust that might have been on your lens when you shot the picture.

Usually these tools are called Healing Brush or Rubber Stamp or Eraser.

In Snapseed it’s called Healing. Just brush your finger over the area that needs cleanup.

Picture Editing Cleanup
Back to top

Closing thoughts on picture editing

Even if you don’t download Snapseed, you should be able to make most or all of these changes in another free app, so try a few out and use your favorite. Have fun!

If you want to get really serious with picture editing or edit multiple images at once, it’s best to invest in a paid tool like Photoshop or Lightroom.

But it’s 100-percent OK if you need to do this on the cheap for now. As long as you’re editing your photos, you’re off to a great start.

So what do you think? Did these picture editing tips help you? I hope you can see that the key to great images isn’t a deep, dark secret. It just comes down to figuring out what edits your photos need and being consistent about it.

Stop hesitating and just dive in, because learning comes from experience.

Pretty soon all your entrepreneur friends will be coming to you asking, “How do I edit photos?” and you can impress them with your newfound image editing knowledge. Have fun sprucing up your site with your gorgeous new images!

The post 10 best practices for picture editing appeared first on GoDaddy Blog.


How to create a web design contract that converts new clients into long-term customers

0
0

A web design contract protects you, your time, your bottom line and your sanity. As with any contract, a web design contract defines the business and legal relationship between you and your client, as well as the personal relationship concerning business practices, communication and interactions.

Legally, it’s a mutually binding agreement, where each party makes commitments around deliverables and compensation for the work to create them. If either party fails to meet their commitments, the contract becomes the basis for possible legal action.

Why you need a web design contract

Web Design Contract Meeting With Tablet

Beyond protection, contracts contribute to your peace of mind, as well as the success of your business. When new to the job, less experienced and full of optimism, you may have thought or said:

  • “I’m a small business, I don’t need a contract.”
  • “It’s a small project, why bother with a contract?”
  • “I don’t want to scare clients with imposing documentation.”
  • “I trust my clients to pay me for the work I deliver.”
  • “I’ve never had a problem that needed a contract to resolve.”

As an overwhelmed fledgling freelancer, you were dealing with all sorts of start-up processes, and adding a piece of overly legal documentation to the mix sounded crazy. But as an established professional, it’s time to step up your game.

Different web designers and developers need different web development contracts

There’s no one-size-fits-all solution, and the web development agreement that’s right for you won’t be right for others. Contracts are critical in:

  • Specifying a clear scope of promised deliverables.
  • Making sure you get paid.
  • Describing each party’s role in the process, including actions, confidentiality, and consequences of not fulfilling that role.
  • Clarifying who owns the work after delivery.
  • Explaining post-delivery activities, in terms of changes, warranties and liabilities.
  • Mitigating common “what if this happens” scenarios.
  • Protecting yourself in the event of exceptions.
  • Creating a helpful reference document for later.
  • Setting the stage for a successful relationship.

Related: How to improve your web design process

Bad client situations help create a great web design contract

Generally, clients have no idea what goes into creating a website.

We hope they realize they’re paying for our professional expertise, and that we’ll lead, educate, and make the process as easy as possible. It’s our responsibility to avoid confusion, especially around deliverables and compensation.

If every client was perfect, you wouldn’t need a web development agreement. If every engagement went according to plan, there would be no horror stories about web pros or clients.

A web design contract helps us avoid bad situations, including misunderstandings, mistaken assumptions, lack of respect, unruly behavior and either party feeling taken advantage of or abused.

These situations stem from communication problems, and a clear, well-written web design contract can help avoid them. Should you encounter a new challenging client situation, consider adding a clause to your contract.

Related: Difficult clients and how to manage them

Why your clients need a web design contract

Web pros and clients share many needs addressed by contracts, such as clarifying the scope of deliverables, and compensation for those deliverables.

The website development agreement creates a mutual agreement from both sides, by setting expectations, establishing boundaries, and explaining how things work. In addition, contracts:

  • Create accountability between the client and their service provider, so the project gets done on time and in budget.
  • Craft an understanding of the roles each party will have in the project, who is responsible for what, and specifically what they must do and provide you, so that you can deliver as promised.
  • Ensure they are hiring a professional who takes their business and craft seriously.

Related: 14 tips for successful web design projects

Starting the process with project costing

Most projects start out with a speculative form of preliminary documentation that initiates the project costing conversation — and ideally leads to a more formal contract.

Four cost presentation options cover increasing levels of complexity, formality and required work.

Estimates

These provide a general idea of whether services can be delivered within budget in the client’s required timeframe — and are offered with the understanding that details could change as more is learned about requirements.

This can be helpful early on to manage client expectations. Estimates are considered variable, given the likelihood of as-yet-unknown factors, and are not legally binding.

You can’t be required to complete work for an estimated price.

Quotes

These are more formal, with a fixed price constrained by a limited valid timeframe. If your quote is accepted as a formal agreement, be prepared to complete the project at that price.

This is ideal for well-specified services at a flat-rate price, such as a fixed-price Care Plan.

Including a time limitation protects quotes depending on the purchase of other items such as hosting or an SSL certificate, as those prices might increase.

Bids

These provide documented responses to a set of well-defined specifications, often submitted in competition with other bids.

Bids are best when you’re confident you can deliver the winning solution meeting all requirements at a competitive price.

Typically, you save the time and work of gathering requirements before committing to a cost, and those requirements are thorough, including expectations. However, bids are often submitted without detailed discussion, providing little room for negotiation, and are often evaluated with emphasis on the presented bottom line.

Proposals

These deliver a comprehensive, detailed document, and are perfect for letting you outshine the competition.

It’s an ideal platform to feature your portfolio of similar work, and highlight your Unique Selling Proposition (USP), showcasing your value and ability to get the work done.

Although the most time-consuming option, it works well for complicated projects where you can offer multiple options or solutions.

Once you’ve negotiated an agreement with your client based on one of the above methods, it’s time to seal the deal with a comprehensive contract.

Related: How to write a web design proposal 

What goes in a web design contract


Web Design Contract Reviewing Client ProposalWhen you consider guidelines for contract preparation, of course you should make sure your contract includes all of the crucial details and looks good. In addition:

Keep it simple

An overly complicated web design contract may lead to confusion or misinterpretation.

The best contracts are straightforward and make sense to everyone, regardless of their legal expertise.

Streamlined text improves understanding on both sides. By minimizing both legal and technical jargon, you also remove the possibility that the client blames any misinterpretation on your writing.

Make it readable

You know all about readability for websites, and many of the same principles apply here.

Keep the fonts simple, avoiding excessive underlining, italicizing, bolding, or caps. Use text large enough for easy reading, with good use of white space, line spacing, and page numbers. Sub-headings help organize information for easy searching within the document.

Treat each client as a special case.

Each client and project has their own special needs.

An overly generic web design contract may become irrelevant to the majority of clients.

Instead, start with your own comprehensive template and tailor to each client’s needs.

Elements of strong web design contracts

A website development agreement needs to cover some basics, no matter what business you’re in, or what kind of project it is. At its simplest, a web design contract covers six key areas:

  1. Introduction.
  2. Scope of work.
  3. Financials.
  4. Process.
  5. Legal.
  6. Agreement.

Let’s look at each of these in a bit more detail:

1. Introduction

  • Clear and informative introduction of you, your business, and the potential partnership
  • If multiple players are involved, short team member bios
  • Contact information and communication preferences

Related: Customer service and communication principles for web designers and developers

2. Scope of work

  • Scope of work, with details of exactly what is (and is not) included
  • Deliverables
  • Objectives
  • Timeline

Related: Why you should use WordPress website prototypes to avoid scope creep

3. Financials

  • Payment terms, including deposit, schedule, advance payment incentives
  • Accepted payment methods, including online payments
  • What happens financially if the project is cancelled, or goes dormant for some time

Related: How to get clients to pay on time

4. Process

  • Details about how your process works, including steps, who will be involved, and when revisions and approvals are needed
  • Roles your team and the client’s team will play
  • Materials and resources clients need to provide

Related: Tools for gathering content from your clients

5. Legal

  • Copyright and ownership of work
  • Location of legal filings and proceedings
  • Warranty of work
  • Support and maintenance
  • Dispute resolution
  • Privacy and confidentiality
  • Termination

Related: How to start a WordPress maintenance business

6. Agreement and signature

  • Validation of a legally binding agreement
  • Confirmation that they have the authority to enter into it
  • Contact information and signatures

Web Design Contract Agreement In Writing

Resources for your web design contract

Developing your own contract from scratch can be time-consuming, and you may forget something important. Then again, paying someone else to create your custom contract can get expensive.

The compromise solution starts with finding a free, customizable web design contract template.

Ideally, you’ll locate a well-tested web design contract template that has all the necessary elements and has endured throughout the years.

Both Github and Docracy host free web design contract templates, while many others are hosted on the authors’ websites. Here are three of the most popular free web design contract templates for web pros.

Contract Killer

This popular open-source contract for web professionals was developed by Stuff & Nonsense, a UK-based design company. Its popularity arises from the fact that it’s easy to understand, with minimal legalese and a touch of humor.

First developed in 2008, and last revised in 2016, it covers all of the major aspects, including what you’re being hired to do, payment schedule and details, how changes will be handled, intellectual property rights, and what both parties agree to.

The latest revision even includes specific technical issues such as SEO and mobile browser testing.

AIGA Standard Form of Agreement for Design Services

AIGA allows you to create customized Terms and Conditions for different types of design engagements. It takes a modular approach, with two foundation modules usable for all design assignments (Basic Terms & Conditions, and Intellectual Property Provisions), and additional modules that can be added as needed for specific design disciplines.

The template includes instructions and guidance for use and customization, acknowledging that most designers develop a custom proposal document per project, and then create the appropriate set of terms and conditions to attach to it.

When joined together, the custom proposal and attached terms and conditions provide the complete binding agreement.

In addition, it provides guidance on advance preparation, project planning, what is sent to the client, and finding and working with an attorney.

Web Design Law’s Design Contract for Freelance Web Designers

This one is a robust and all-inclusive resource. It starts with an excellent overview of contract development and use, then provides a number of templates. The full template set includes letter of agreement, project proposal, two versions of terms and conditions (full and condensed), invoices, past due reminders, and collections letters.

Tips for using contract templates

Web Design Contract Handshake Over Coffee

A template is only a starting point. Even the perfect template needs customization — whoever created that template didn’t know you, your business, or your clients.

Combine the best elements of several templates. Cherry-pick the applicable elements of multiple contracts to build your own super-template.

Have several people review your final version. When you think you’ve created your best template, solicit review by those you trust, including web pro peers, friends, or your business attorney.

Proofread. Again. Review and revise until you think it’s perfect. Step away for a day or two, then proofread again.

Common errors in a web design contract

Guard against common contract errors that can render your web design contract useless or unenforceable.

Dates: Preparation and signing dates must be clearly stated, as well as any deadlines related to deliverables or payments.

Not getting help: If you feel you can’t write a good contract, even starting with a web design contract template, considering hiring a lawyer. It will be an investment in protecting yourself from potentially costly mistakes.

Signing: Of course both you and your client must sign the contract. When dealing with a company of more than one, make sure you have the correct signatory. Ensure that both you and the client have full signed copies.

Creating and sending your contract

And speaking of signing, establishing an efficient signing process saves time, increases convenience for your clients, and improves the way you do business.

DocuSign enables collection and management of digital signatures for contracts as well as other important business documents, such as purchase orders or partnership agreements.

Additional services help you verify identities, perform background checks, and manage digital workflows. Benefits include:

  • Faster turnaround time in getting contracts distributed and signed
  • Quicker creation of new contracts using templates
  • An intuitive and immediately usable method of signing
  • Integration with dozens of other applications and services
  • Flexible customization and adjustments
  • A digital audit trail that time-stamps signatures

While you can sign up for a free trial of DocuSign on its own, you can also use it through an Office 365 business plan integrating apps and services.

Related: What is DocuSign?

Closing thoughts on your web design contract

Your ultimate goal is to create a clear yet concise contract covering the essentials of the scope of work, deliverables, financials, timeframe, process and legal responsibilities — while simultaneously cultivating trust and respect, and providing everything potential clients need to make the decision to move ahead with you.

The above content should not be construed as legal or tax advice. Always consult an attorney or tax professional regarding your specific legal or tax situation.

The post How to create a web design contract that converts new clients into long-term customers appeared first on GoDaddy Blog.

4 social media trends for 2019

0
0

As you look at your marketing strategy for the rest of the year ahead, it’s important to make sure you’re incorporating the latest social media trends.

Utilize these social media trends for 2019, and you’ll be sure to engage current and potential customers with every post, on every platform.

1. In-the-moment content

Have you noticed that more Instagram users and businesses are using Instagram Stories? That’s because this kind of in-the-moment content is fun, relatively easy to create and gets the message out quickly. It’s definitely one of the key social media trends your business should be using in 2019.

In fact, Buffer predicts that this year, “in-the-moment content will win out over highly-produced content.”

You can use Instagram Stories to show off new products, showcase what’s happening live at an event, start a promotion, and most of all — give users an inside look at your business. The more they get to know your business and familiarize themselves with your products, services and team — the more it’ll feel like home when they visit you.

Here’s Compass Rose in Washington, D.C. showing fans a BTS, or behind-the-scenes, creation of one of their most popular dishes, Khachapuri:

Authenticity and transparency are very trendy right now on social media because young users want to get to know brands that are genuine. So, share those stories, behind-the-scenes videos and inside looks — your fans will love to share that content with their friends and followers.

Instagram Stories also present a great opportunity for businesses to engage with new customers. Monitor your notifications and see when users are tagging your business in their Stories. Then, respost that content to get engaged with your fans — just hit “Add to your story.”

This leads us to our next trend.

2. User-generated content

Adding content from your fans and followers into your social media content strategy is a great way to engage with your followers the rest of this year. In 2019, be vigilant about your notifications so you can use user-generated content on your social media platforms.

Most user-generated content is completely organic.

  1. Monitor who’s tagging you and talking about you on social media.
  2. Share this content on your channels!

For example, a customer might come into your restaurant, snap of photo of their meal and tag your business. You can share this post on Instagram, Facebook and Twitter — tagging that user, and thanking them for coming by and sharing that content with their followers.

Here’s Hattie B’s, famous for its Nashville hot chicken, reposting a customer photo and giving them photo credit in the caption:

According to Offerpop, 85% of consumers find visual user-generated content more influential than brand photos or videos. This means that consumers want to see other people enjoying your products and services to feel confident that they themselves will enjoy your products and services.

And, this is especially true among the generation every business wants to target — millennials.

In one survey, 51% of millennials said that user-generated content from strangers is more likely to influence their purchase decisions than recommendations from their friends and family. 

3. Social media ads

Sometimes it can feel like your posts on social media aren’t getting the results you want. The truth is, it’s important to invest both time and money into your social media strategy.

 One kind of paid content that’s easy to create and manage are boosted Facebook posts. You can boost your best Facebook posts to get new eyes on your brand.

Using boosted posts is an excellent way to reach new people who are likely interested in your business but aren’t currently your fans on Facebook. When you boost a post, you have the potential to reach more people and entice current fans and potential new customers to visit your business.

Note: This is different than creating a Facebook Ad. While boosting a post is still considered an ad, Facebook ads are created through Ads Manager and have more customization options.

To start boosting, think about high-quality content you’d like to feature in your boosted post. If you’re putting money behind a post, it should look great. You’ll need a high-quality photo or video, and typically, a good post to boost is for an event, special, discount or promotion.

And, it’s important to keep your caption short and sweet. Facebook users have a lot of content to scroll through on their timelines. Make your content exciting enough for them to pause and click through to your page to find out more.

Pro Tip: Before you boost content, publish your post on Facebook and to get some organic reach and engagement (i.e. likes, clicks and comments.) Boosted posts tend to perform better if they have earned some engagement first.

4. Using Twitter

Speaking of reaching new customers, if you haven’t already integrated Twitter into your social media strategy, it’s time to embrace it.

More businesses use Twitter than every other social channel except for Facebook, according to Convince & Convert, and that’s because it still has an “active, vibrant community” of mostly “urban, educated, high-income” adults.

So, how can you start using Twitter better? First of all, anything you post on Instagram or Facebook can have a place on Twitter as well. Think about who your audience is on Twitter and make sure they would find the interesting or valuable and use trending hashtags to increase the reach of your tweets.

If you’re stuck on the best content to tweet, try these ideas:

  • Tweet your daily specials, promotions or deals
  • Post fun, engaging content for users to like and retweet of your team, product and services
  • Start your own weekly hashtag like #winewednesdays 
  • Retweet other users in your neighborhood or community
  • Hold a Twitter Q&A where you get insights from your customers and followers
  • Reach out to Twitter users and start conversations — that’s what they’re there for!

Checked the forecast and it turns out there’s a 100% chance of pizza bagels. 🍕🥯 #treatchaself #fridayvibes #carbs pic.twitter.com/hqSGJzG0bC

— Call Your Mother Deli (@CYM_DC) February 15, 2019

Social media is all about using the platforms that matter most to consumers in an engaging way. If you utilize these social media trends for 2019 for the rest of the year, you’ll be sure to start seeing more engagement and more results.

Engage your customers like never before with GoDaddy Social. We help businesses elevate their online presence on the platforms that matter most. Get started with us here.

The post 4 social media trends for 2019 appeared first on GoDaddy Blog.

A beginner’s guide to branding your business

0
0

This post was originally published on Feb. 12, 2018, and was updated on May 21, 2019.

While conversions and sales are important, branding your business is just as vital. A bad first impression is no impression at all, and poor branding is the equivalent of showing up for an important meeting in a T-shirt and cargo pants.

There should be no excuse for poorly implemented branding.


Defining your brand’s personality, conceptualizing your visuals (such as a logo), claiming social media handles and custom email addresses, and much more should all be on your checklist. The need to capture the very best leads and customers demands it.

With that in mind, we’ll spend this article talking about four key basics for branding your business that you’ll need to follow. First, however, let’s discuss why branding is so vital!

Why branding your business should be a primary concern


The term branding is bandied around a lot. Essentially, it means the visual presentation of your small business, including your logo, color scheme, “personality” and even your business name.
Given how all-encompassing this concept is, there are a wealth of reasons to make sure it’s at the forefront of all your business decisions. For example:

  • Implemented correctly, branding can increase your perceived professionalism.
  • It generates a unique “brand identity,” which potential customers will recognise regardless of where it appears.
  • Branding offers consistency across all of your promotional channels, such as social media, newsletters, print media and wherever else you choose to advertise.

In short, branding is more than just a fancy logo — it’s how your company is perceived, what it stands for, and how business is conducted. All in all, working on your branding efforts is vital to success.

Start branding your business in 4 key steps

Fortunately, branding your small business isn’t complicated. The following four steps will go a long ways towards getting you started.

  1. Define your key goals.
  2. Understand your target audience.
  3. Conceptualize your brand’s personality and identity.
  4. Run consistent social media and marketing channels.

Now that you’re familiar with the importance of branding, let’s move through these four steps to ensure you’re getting the most out of your marketing efforts.

1. Define your key goals

It’s a good idea to nail down your major goals early on. Doing this will give you a great foundation for any decisions you’ll make from here on out. If a potential idea doesn’t fit with your key goals, you’ll either need to refine it or scrap it.

To do this, you’ll need to ask yourself a few simple questions, such as:

  • What do I want to achieve?
  • What is the longevity of my business?

There’s much more you could work on here. Ultimately, however, you’ll want to determine some specific objectives for your business and note them down.

2. Understand your target audience

Branding Your Business Audience

Just as with your business goals, you also need a firm grasp on your target audience when you’re branding your business. The answer to the question, “Who are you trying to sell to?” should not be “Everyone.”

Narrowing your potential customer base may sound counterintuitive to good business, but by knowing who to target, you’ll attract leads who will be more inclined to convert.

To begin, you’ll simply want to look at your current customers and those of your competitors, and start to generate an average customer persona.

Next, list the benefits of your products and services, and make sure they match this persona. The idea is to start thinking about what the customer needs from you before they’ll open their wallet. Once you understand that, you can move onto developing your communications.

Related: Why a target audience matters and how to find yours

3. Conceptualize your brand’s personality and identity

At this point in branding your business, it’s time to take what you already know about your company and customers and develop a specific personality and identity to match. It should be clear why this is important. When you project a persona that your audience can relate to, they’ll be more inclined to gravitate toward your products and services.

Quiz: Your Brand Personality

Take our quiz to discover which personality best suits your brand.

Question

Your answer:

Correct answer:

You got {{SCORE_CORRECT}} out of {{SCORE_TOTAL}}

SHARE YOUR RESULTS

ShareTweetPinEmail

Your Answers

There are a number of elements to consider here, such as your logo, the tone you use when writing and even the format of your email address.

Your email, for example, will benefit from a strong username or “local-part” (such as hello or contact), and should always be attached to your website’s domain.

As for the visual elements, you’ll first need to consider what makes your business stand out, such as your mission statement, your brand “essence” and the promises you make to your customers.

Next, begin thinking about how those traits can guide the choices you make with regard to your typography, logo and color scheme. There’s more to consider down the line, but this is a solid first step to take.

Related: How to choose brand colors and use them on your website and Everything you need to know about creating a brand style guide

Editor’s note: Part of having a consistent brand personality involves ensuring your name is consistent across all platforms. Be sure to register your business’s domain name sooner rather than later to keep anyone from poaching it.

4. Run consistent social media and marketing channels

Branding Your Business Social
Photo: Jason A. Howie / CC BY

Finally, you can begin to step away from your website and look to other direct marketing channels, such as social media. Forty-one percent of Americans think that having a strong social media presence is important for any business, so you need to give this due attention.

If you’re not already on social media, this is the perfect time to claim any available handles, even if you don’t plan on using them.

This will help you offer consistent social media branding and deter domain squatters from hijacking your efforts.

After that stage of branding your business, you need to start developing a strategy and then create your content. How you do this depends largely on your goals and audience. It might take some effort, but the work you do to brand your business will help you immensely in the long run.

Related: How to claim your social media handles — and why you should do it now

Conclusion

Branding your business should be a pressing concern, especially those who haven’t previously considered it. In this post, we’ve discussed branding your business — more specifically what constitutes good branding — and how to achieve it. Let’s recap the four steps you’ll want to follow:

  1. Define your key goals to provide a foundation for your branding efforts.
  2. Hone in on a suitable target audience so you’ll know exactly who you’re aiming your brand at.
  3. Create a personality and identity related to your target audience and goals to homogenize your efforts.
  4. Make sure your marketing and social media is on point so you can start developing a strong conversion funnel.

Branding can have a direct impact on success, both in the short- and long-term. The fortunate news is that branding your business doesn’t have to be difficult. Use these steps to kickstart your marketing efforts and establish your company.

The post A beginner’s guide to branding your business appeared first on GoDaddy Blog.

RT @annie_parker: Dear conference organisers, diversity is not achieved by just inviting more women to your stages, it’s inviting people with disability, people of colour, veterans, young, old & more... just turned down another conference for not doing this. Do better!! #DiversityandInclusion

0
0

RT @annie_parker: Dear conference organisers, diversity is not achieved by just inviting more women to your stages, it’s inviting people with disability, people of colour, veterans, young, old & more... just turned down another conference for not doing this. Do better!! #DiversityandInclusion http://twitter.com/kshahwork/status/1130954452008087554)

RT @TP_USA: We are not Equal until we are All Equal! #DiversityandInclusion #DiversityMatters https://t.co/KkntbFGitD

0
0

RT @TP_USA: We are not Equal until we are All Equal! #DiversityandInclusion #DiversityMatters https://t.co/KkntbFGitD http://twitter.com/kshahwork/status/1130954759194775555)

RT @SDeshmukh_MD: Diversity is a key driver of innovation and ultimately a critical component of success — radiology is lucky to have leaders like @KatarzynaMacura! #DiversityandInclusion #WIMStrongerTogether https://t.co/10xDFS1K2n

0
0

RT @SDeshmukh_MD: Diversity is a key driver of innovation and ultimately a critical component of success — radiology is lucky to have leaders like @KatarzynaMacura! #DiversityandInclusion #WIMStrongerTogether https://t.co/10xDFS1K2n http://twitter.com/kshahwork/status/1130954780094939137)

RT @AnnJayMD1: “Gender inequity and sexual harassment are intertwined in a viscious cycle. Gender inequity creates an environment that permits sexual harassment, which then further leads to even more gender inequity.” @reshmajagsi #DiversityandInclusion #ACR2019

0
0

RT @AnnJayMD1: “Gender inequity and sexual harassment are intertwined in a viscious cycle. Gender inequity creates an environment that permits sexual harassment, which then further leads to even more gender inequity.” @reshmajagsi #DiversityandInclusion #ACR2019 http://twitter.com/kshahwork/status/1130954823694737408)

Encrypting a small business: Why remote working could be your blindspot https://t.co/M6pikiCcaG https://t.co/kxcTPJ5Qba

0
0

Encrypting a small business: Why remote working could be your blindspot https://t.co/M6pikiCcaG https://t.co/kxcTPJ5Qba http://twitter.com/kshahwork/status/1131162458255761409)

8 things you should know before starting a small business https://t.co/986OY2lkcg https://t.co/iHiWL3tqr5

0
0

8 things you should know before starting a small business https://t.co/986OY2lkcg https://t.co/iHiWL3tqr5 http://twitter.com/kshahwork/status/1131163531301261312)

What to Look for in Cloud HR Software for Your Small Business https://t.co/Ej9opTC1Rz https://t.co/cNiP5hmC54

0
0

What to Look for in Cloud HR Software for Your Small Business https://t.co/Ej9opTC1Rz https://t.co/cNiP5hmC54 http://twitter.com/kshahwork/status/1131162978823352322)

The do’s and don’ts of a franchise store remodel | Restaurant Franchising & Innovation Summit | FastCasual https://t.co/msmcQ7eNMI https://t.co/OB2TMWeuxK

0
0

The do’s and don’ts of a franchise store remodel | Restaurant Franchising & Innovation Summit | FastCasual https://t.co/msmcQ7eNMI https://t.co/OB2TMWeuxK http://twitter.com/kshahwork/status/1131164537850404864)

Welltok Report: Why It Is Time to Rethink The Patient Journey – Health IT https://t.co/1CjXBrQoFc https://t.co/KT3SlrylKT

0
0

Welltok Report: Why It Is Time to Rethink The Patient Journey – Health IT https://t.co/1CjXBrQoFc https://t.co/KT3SlrylKT http://twitter.com/kshahwork/status/1131166947167678464)
Viewing all 1078 articles
Browse latest View live


Latest Images